F.A.Q.'s and How-To's
How can I add or make changes to a buyer on a financed loan?
To add a new buyer:
Load the current buyer in Bookkeeping > Info. Use the "Add a Co-Signer" button or "Add a Co-Buyer" button to add another person to the loan. Changes to the new buyer will be automatically saved.
To change the primary buyer:
Load the current primary buyer in Bookkeeping > Info. Click "All Buyers". Select the co-buyer or co-signer whom you want to make the primary buyer and click "Set as Primary". Changes will be saved automatically.
To remove a buyer:
Load the buyer in Bookkeeping > Info. Click "All Buyers". Select the buyer you would like to remove and click "Remove Completely". Changes will be saved automatically.
Note: You cannot remove the primary buyer. If you need to do so, first follow the steps above to set a new primary buyer, and then remove the old primary buyer.
Any other changes to a buyer's general information can be done on this screen and will be saved automatically.
How can I change the style of my credit reports or view them in a different format?
How can I input last names without limitations on capitalization, such as McDonald?
How can I locate a customer that was previously entered into the DMS to load their information into the Buyer screen?
How can I manage lead sources in the CRM?
When setting the lead source for a client in the CRM, click the globe icon to choose from a list of pre-saved lead sources. Selecting from this list (rather than typing in the lead source manually) is the best way to ensure that your lead sources are streamlined and accurate.
To add or remove a lead source from the globe icon dropdown, open your DMS and go to Sales > Buyer tab. Click on the blue arrow on line 15. Lead sources can be added, edited, or deleted from this list. Changes will be pushed to the CRM overnight.
Note: You cannot delete a source if it was used on a prior sale.
How can I print a credit application for a customer to sign?
On the Buyer Information screen, make sure as much information as possible is filled out, including all required fields (marked with an asterisk (*)). Depending on your DMS Settings, the Email field (line 11) may also be required. Then click "Run Credit".
Select "ASN Credit App" (or the Alternate Format) from the Credit Application Forms on the left. From here you can Print, Preview, or Email the application.
Alternatively, on any saved deal (pending, tripped, or final), you can also go to the Contracts screen and print the Credit App from there. If you do not see this contract in your list, you may need to add it to a contract button first.
How can I pull credit on a customer?
Note: In order to pull credit in the DMS, you must first be signed up with 700 Credit.
On the Buyer Information screen, make sure all required fields (marked with an asterisk (*)) are filled out. Depending on your DMS Settings, the Email field (line 11) may also be required. Then click "Run Credit".
Select the company you want to use to pull credit on line 4, the bureau(s) you want to pull on line 5, and the client(s) whose credit you want to pull on line 6. Then click "Retrieve Credit". Note: Make sure you have a completed and signed credit application or an online credit application completed directly by the customer before pulling credit.
How can I receive a deposit from a customer before a deal is tripped?
You can take a deposit on a pending deal, or take a deposit that is only attached to a customer (without an existing deal).
To take a deposit on a pending deal:
Load the deal and open the Buyer tab. Select "Cust Deposit". Enter the deposit details. If you select "Apply Towards Down/Deferred First", the system will automatically apply the deposit to the down payment once the deal is tripped. If you uncheck this box, you will see a payable to the customer that you can apply towards money they owe once tripped. Once all of the details have been entered, click "Save Deposit".
In a situation where the deposit was not auto-applied, the credit on the customer's account can later be adjusted against any open invoices using the Adjustments screen. Go to Bookkeeping > Adjustments and do a Debit-Credit memo. In this case the adjustment amount should be $0. If the debit amount is greater than the credit amount, you will need to record a partial payment on the open invoice before saving the adjustment.
To take a deposit without an existing deal:
On the Deal screen, click "New Sale" to clear out any sale currently loaded.
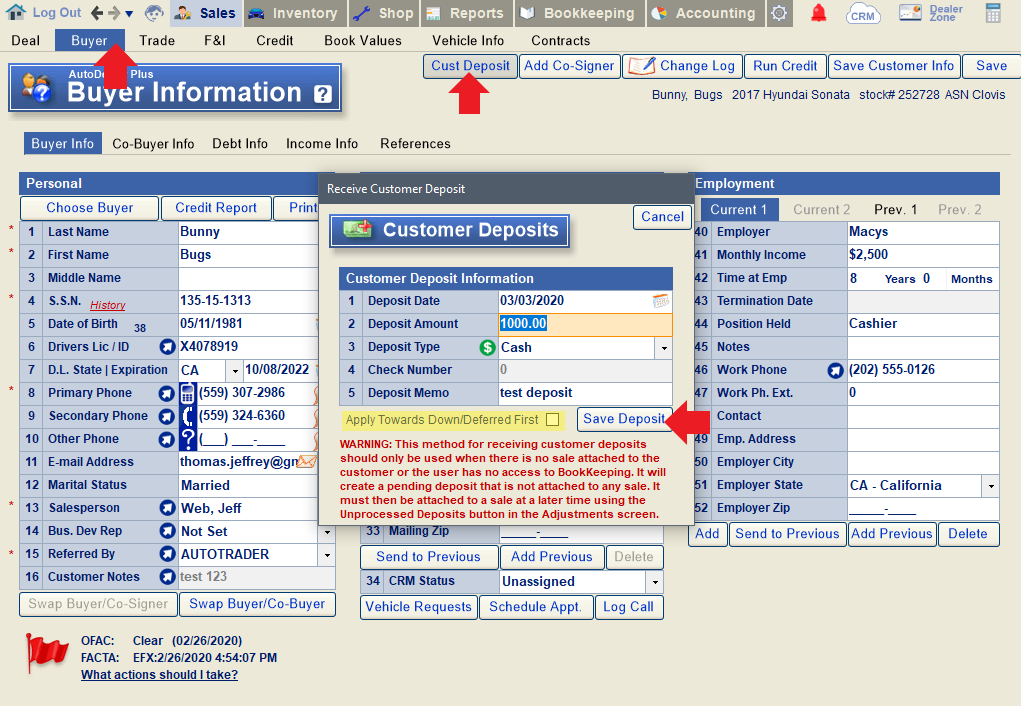
Open the Buyer tab. Add the customer's name and any other information you may have and click "Save Customer Info". Then click "Customer Deposit".
Enter in the deposit details and click "save deposit". If this customer is later added as a buyer on a deal, the system will automatically attach the deposit to the sale once the deal is tripped, and apply the money towards any down/deferred payment owed. If the customer is never added to a deal (for example, in a situation where someone else puts down the deposit for a customer but is not listed as the buyer on the deal), you will need to go to Adjustments > Unprocessed Deposits and attach the deposit to the sale after a deal has been created and tripped.
To Process a Deposit that was Not Automatically Attached to a Sale:
Go to Bookkeeping > Adjustments. Load the customer and select the invoice towards which you want to apply the deposit. Then click the red "Unprocessed Deposits" button.
Highlight the deposit you want to apply and click "Process Deposit".
How can I restrict certain deposit types when receiving money in the system?
How can I see the full social security number for a customer on a website lead that I received?
If you are receiving website leads via email, you will only be able to see the last 4 digits of the customer's SSN for security purposes.
However, the lead will also be sent to your CRM, and you can see the full social security number there if you have property security access. You will also be able to see the full SSN once you import the customer into your DMS if you have property security.
To see the customer's social security number in your CRM, open the CRM and locate the customer in your client list. Click on their name to open their information.
From the Client Info screen, click on the pencil icon to open detailed information about the customer, including any and all finance info.
If the social security number was provided, you'll find it under the "Personal" tab.
To adjust an employee's security so they can see the full SSN, go to Settings > Security in your DMS. Load the employee in question and give them a green checkmark next to security #115 (SSN) and security #635 (Full SSN and TaxID Access). Please note that these changes will take effect in the DMS the next time the employee logs in, but will take effect in the CRM overnight.
How do I add a customer back to our email list after having been opted out of receiving emails?
How do you enter a business or company name as the buyer on a deal?
When a business name is being used as the buyer on a deal, check the business Box from Deal screen.

Then enter the business dba name and legal name as need.

Note: If you do not want system to use default format for names, right click on label of line 1 and choose "Enable Formatting". This means you can type ASN instead of default Asn.
My customer does not want to receive any emails from us. How can I unsubscribe them or take them off our list?
To Unsubscribe Customers from Emails Sent in the DMS:
Load the customer in the Buyer Screen (Sales > Buyer) or the Info Screen (Bookkeeping > Info). Click the mail icon next to the customer's email address (line 11). This will open a new popup to send the buyer an email.
Click "Add to Opt-Out List".
Alternatively, in the Info screen, simply change line 12 (Opt Out of Emails) to "Yes".
To Unsubscribe Customers from Emails Sent in the CRM:
Emails sent from the CRM have an "unsubscribe" link in the footer of the message that customers can click on to unsubscribe.
You can also locate the email in your list of CRM emails sent to the customer and click the same unsubscribe link on behalf of the customer. To do this, click on the sent email in your CRM to open it, and then click the unsubscribe link.
My customer does not want to receive any texts from us. How can I unsubscribe them or take them off our list?
To unsubscribe customers from texts sent in the DMS:
Option 1: Ask the customer to reply “STOP” to any text sent to them from the DMS, and they will be automatically blocked from receiving future DMS texts. To opt back in, they can text "START" to the same number (assuming they still have the text thread).
Option 2: Load the customer in the Buyer screen (under the Sales tab) or in the Info screen (under the Bookkeeping tab). Click the text icon next to the customer's phone number where they receive texts.
In the "Send Text Message" popup, click "Opt-Out". The system will ask you to confirm that you are adding the phone number to your Opt-Out (Do-Not-Text) List. Please note that this cannot be undone.
Alternatively, if you just want to turn off specific payment reminder texts for the customer, you can do so from the Financed Loans screen. Go to Bookkeeping > Financed Loans. Load the customer in question and click "Payment Reminders".
Change lines 1-5 to "no"/"none" and click "Save". These changes will only affect the Auto-Texter settings for the currently loaded customer.
To unsubscribe customers from texts sent in the CRM:
Ask the customer to reply “STOP” to any text sent to them from the CRM, and they will be automatically blocked from receiving future CRM texts. To opt back in, they can text "START" to the same number (assuming they still have the text thread).
Once I've pulled credit on a customer, how can I go back and retrieve the credit report?
From the Buyer Screen:
Click the "Credit Report" button.
From the Run Credit/Credit Check Screen:
Select the report you want to view and click "Preview".
Note: You can switch between different credit report styles by clicking the "Switch Style" button.
What does a Red Flag on the Buyer screen signify?
Once you've pulled credit on a customer, you'll see that the flag shown on the bottom-left corner of the Buyer screen will either remain blue and show "clear" for OFAC and FACTA, or turn red with an alert on one or both of these items. The red flag is there to alert you that there is data on the OFAC check or credit report that you should be aware of before selling a vehicle to the customer in question. You may click on either item (OFAC or FACTA) to get more details.
In the case of a Red Flag alert, you can click the "What actions should I take?" link for more information on how to proceed.
For more information on when you should call the OFAC hotline, read this FAQ from the US DoT.
What should I select for the "D.L. State" field on the Buyer Screen if the buyer's license is from a country that does not show up in the dropdown?
Where do I add a a suffix for a customer's name (Jr., Sr., etc.)
Why does changing Buyer information in one deal also change it in other deals?
Buyer records are shared profiles, not deal-specific records. Each buyer is uniquely identified by key information such as their SSN, Driver's License, email address, and phone number. This allows the system to automatically recognize returning customers and load their complete buyer profile into any new or existing deal.
When you update a buyer's profile, the changes are applied to that buyer's master record, which means all deals associated with that buyer will display the updated information, not just the deal you are currently editing.
Additional notes:
-
Previous addresses and employment records are retained and can be managed as historical information while adding new details.
-
All buyer profile changes are recorded in the Buyer tab's Change Log for auditing purposes.
-
To maintain clean customer records and ensure accurate future communication through your DMS or CRM, do not create duplicate buyer records using the same identifying information (such as SSN, Driver's License, email, or phone number).
 Caution
If you open an existing deal and overwrite the buyer's information with an entirely different person's information, you are editing the original buyer's profile, not replacing the buyer on that deal. This remains true even if the new SSN or Driver's License is different.
As a result, every deal linked to the original buyer will now reflect the updated (incorrect) information.
How to correct this situation:
-
Restore the original buyer's information on the existing buyer profile.
-
Open the Credit tab and enter the information for the new buyer.
-
Save the new buyer profile.
-
Reload the current deal.
-
Replace the buyer on the deal by selecting the newly created buyer profile.
Following these steps changes the buyer only for the current deal without affecting any previous deals associated with the original buyer.
Why doesn't the "Run Credit" button work? Nothing happens when I click it.