Receive Money Screen
Overview:
In the Receive Money tab, you can apply money to an open invoice or create a quick invoice to use immediately. BHPH payments should be applied in the BHPH tab. Two other tabs where money can also be received are the Sales/Buyer using the customer deposit button and Shop/Repairs Orders. These locations are for employees who don't have the security to access the Bookkeeping tab.
Account Information section
In the Account Type filed you can use the drop down to select the type of account you want to receive payments from. Once you have selected the account type, click the arrow button to open a pop up that will allow you to search for the payer.
The Receive Payment from field shows you the currently selected account, if you loaded a customer, the arrow button will take you to the deal screen and load the deal into the screen. The drop down will allow you to quickly load any account that has been recently loaded.
Receipt Information section
1) The Amount field is where you will put the amount of money you are receiving. You can use the arrow to sum all checked invoices in the Open Invoice section and automatically load the total amount.
2) Deposit Account defaults to 1104 – Cash in Transit, this field will only become active if ACH is selected in the Deposit type field.
3) The Date field is the date you received the money.
4) The Deposit Type is where you will choose what form of money you received. Some options are: check, cash, credit card. Selecting ACH will activate the Deposit Account field and allow you to pick the bank account of where funds were deposited.
5) The Check Number field allows you to enter the check number if the form of payment is check.
6) The Memo field allows you to enter a description of the payment. If using a Misc. Customer and a check is the form of payment, you can enter the customers name.
7) The Co-Buyer field will auto-fill if applicable.
8) The financed By field will show you the finance company and what the balance is. Clicking the arrow button will give you the option to load the finance company.
9) Collection Cat. Field allows you choose a collection category by either using the drop down bar or the arrow button.
The Receive Money Notes section is where, with a right click, you can add notes such as accepted forms of payments.
The Sales/Recap/Client Notes will display notes entered in the sales screen.
Open Invoices Search Criteria section
10) Choose Search field is used to filter the active invoices below to find a specific one. Use the drop down to select the criteria.
11) Search Options field allows you to select if you are looking for an exact match or a range.
12) Search Value field is where you will enter the value to search or the beginning value if by range.
13) And field is activated when between is the search option.
The Reset Filter button will clear all the filters.
Open Invoices section
The Open Invoices section shows a list of all active invoices and their information. To select an invoice to receive money on, check the box. If a partial payment is made, double-click that line item. You may also right-click to edit an invoice or do a partial payment.
The Quick Invoice button allows you to create an invoice for that particular customer or vendor.. If you do not use this invoice and leave the screen, the invoice will be deleted.
The Payment Reminders button opens a pop up with automated collection features. Knowme – which is a telephone call and Auto Texter – which allows you to text to your customer's cellular phone. Learn more about these two features at the DealerZone.
The Save button will save your outstanding receipt and you can view them at Accounting-Manage Deposits.
Tip: When applying a payment from a finance company, you can update the Participation, Loan Doc Fee, and Discount amount received or deducted from your payment, by right clicking on the line item and selecting Edit Financing.
F.A.Q.'s and How-To's
How can I edit or remove a fee for ACH or Credit Card transactions?
When convenience fees are set up for credit card or ACH transactions in Bookkeeping Defaults, the system will automatically add (or prompt you to add) the fee when receiving an e-payment. If you are given a prompt and do not wish to charge the convenience fee, you can simply click "No" and the fee will not be added.
Tip: If you do not see this prompt, this would indicate that, at some point, you disabled this popup. Follow these instructions to reset all system prompts if desired.
If the convenience fee has already been added and you want to remove it, simply un-check it in the Receive Money screen, or right-click to waive it in the Financed Loans screen.
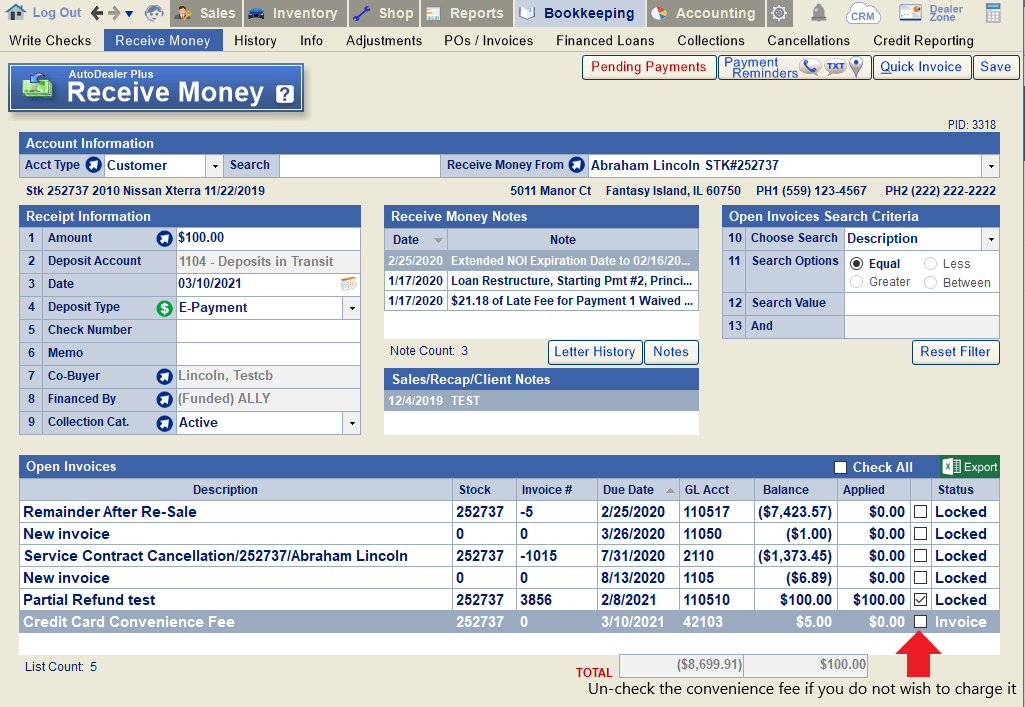
Uncheck the convenience fee in the Receive Money screen. The system will remove the invoice once the payment has been saved.
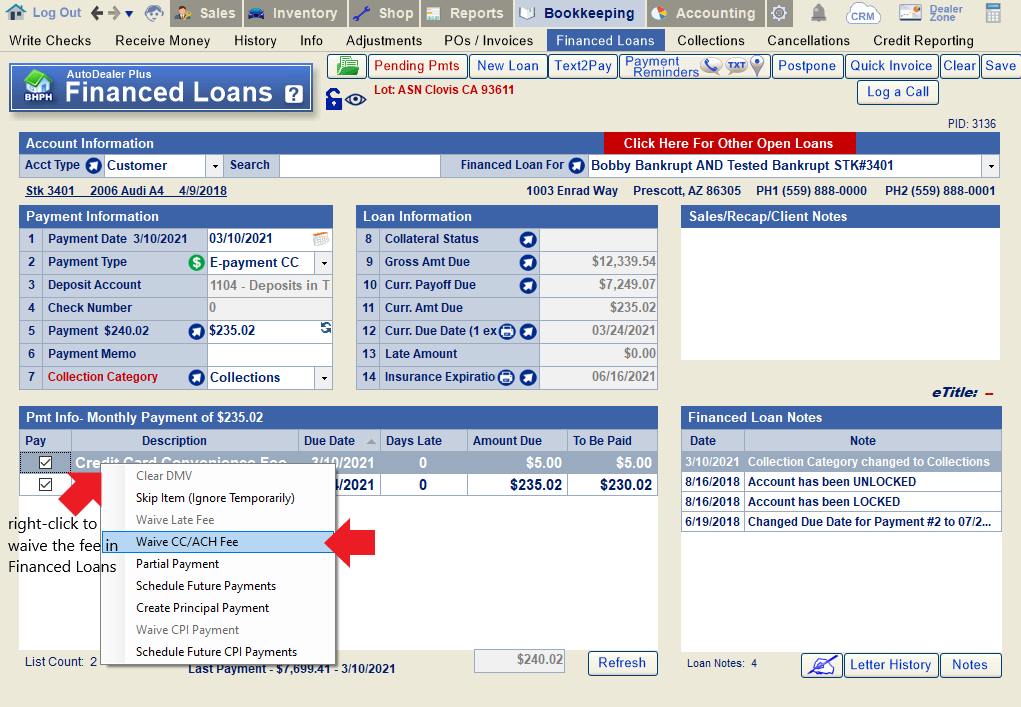
Right-click to waive the fee in the Financed Loans screen.
To edit, the convenience fee, right-click and choose "Partial Payment". Enter the amount to charge and click "Ok"/"Save". Finish processing the payment as you normally would. The remaining amount of the invoice will be automatically deleted once the payment is saved.
Note: The default fee can be edited in Bookkeeping Defaults.
How can I restrict certain deposit types when receiving money in the system?
How can I split an invoice (payable or receivable) into two separate transactions?
How do I charge a convenience fee for payments made by credit card or ACH?
How do I give an employee access to post invoices dated over 90 days in the past/future?
How do I offset a payable and receivable for equal amounts?
The best way to offset two invoices against one another is by using the clearance account. You can do this when you have an open payable and an open receivable for equal amounts under the same customer. (This works even if the two amounts are under separate accounts for the same customer.) While the Adjustments screen can also be used in these situations, this method is preferred because it can be clearly and easily tracked in the History screen and the Ledger.
Below is an example in which a customer owes $7,500 for a deferred down payment on a deal. The same customer is owed $7500 under a vendor account for an off-the-street vehicle purchase. These two amounts can be offset against one another since they are actually associated with the same customer and have a net balance of $0.
First, clear the outstanding payable.
Go to Bookkeeping > Write Checks, and load the account where the payable exists. Choose "electronic payment" as the payment type on line 2. Then, select 11024-Clearance Account on line 1. Select the invoice to be paid in the list below, and use the blue arrow to load the corresponding dollar amount on line 5. Enter a memo on line 6 that references the matching receivable against which you plan to offset this payable. Then click "Save".
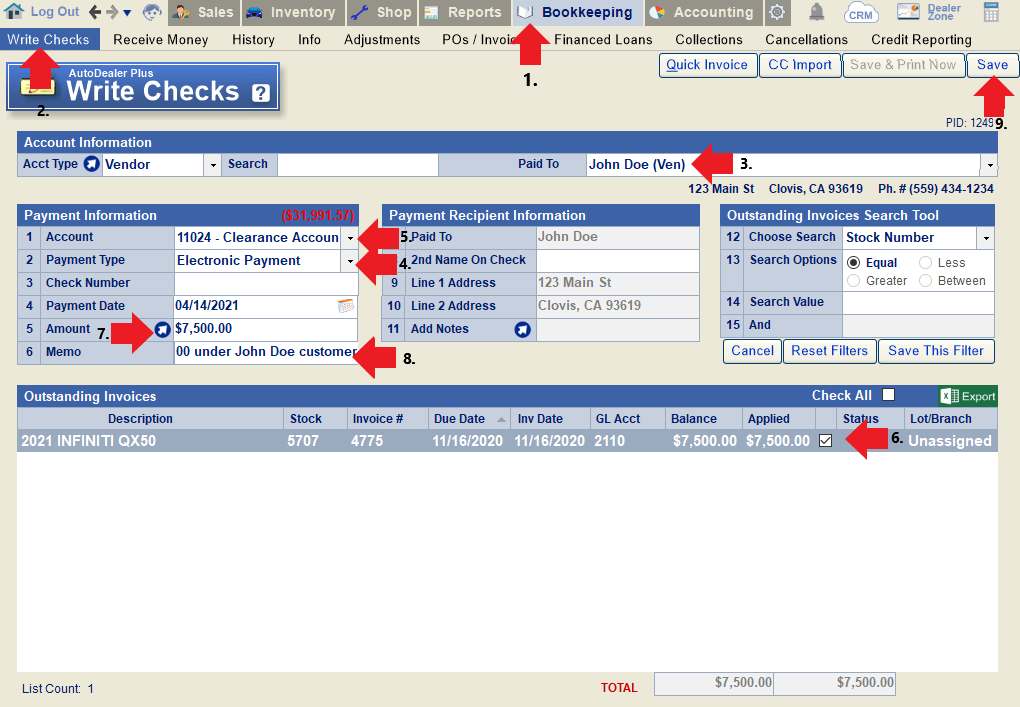
Next, clear the outstanding receivable:
Go to Bookkeeping > Receive Money, and load the account where the receivable exists. Select the receivable from the list of open invoices, and use the blue arrow to apply the amount on line 1. Choose "ACH-EFT" for the deposit type on line 4. Then, select 11024-Clearance Account on line 2. On line 6, enter a memo that references the payable from the prior step. Finally, click "Save".
Both transactions can be viewed in the ledger.
The History screen under both accounts will allow you to clearly track what was done.
Note: This method can also be used to offset a payable to a customer against a shop receivable for the same customer. Simply follow the same steps for receiving the money using the "ACH-EFT" payment method, but do this on the RO screen rather than the Receive Money screen. You will then need to go into the customer's payment history and edit the transaction to change the account to the clearance account.
In a situation where the two amounts do not have a zero dollar net balance, you will need to do a partial payment for the larger amount. (e.g., Dealer owes customer $500, but customer owes shop $300. Receive the full $300 in shop using the clearance account, and pay a partial payment of $300 on the $500 payable in Write Checks using the clearance account.)
How do I print a receipt after receiving money/posting payments?
If money was received in the Bookkeeping section (Receive Money screen or Financed Loans screen):
Go to Bookkeeping > History. Load the account towards which the payment was posted. Select the correct transaction in the Checking History below and click "Print Receipt".
If money was received in the Shop section (RO Screen):
Go to Shop > Repair Orders. Load the RO towards which money was received. Click the "Pmt History" button below line 33.
Select the correct transaction in the Payment History window and click "Print Receipt".
Note: By default, the system prompts you to print a receipt any time you receive money. If you are not getting prompted, this means you previously disabled these messages. Read this FAQ to learn how to reset them.
How do I print a statement or invoice?
Go to Bookkeeping > History. Load the account for which you want to print a statement/invoice. Click the Letters/Reports button on the top-right.
For vendors, choose "Open Receivables". For customers, choose "Invoices" or "Loan Statement" (for BHPH/financed loans). Set a date range on lines 1 & 2 and click the print icon.
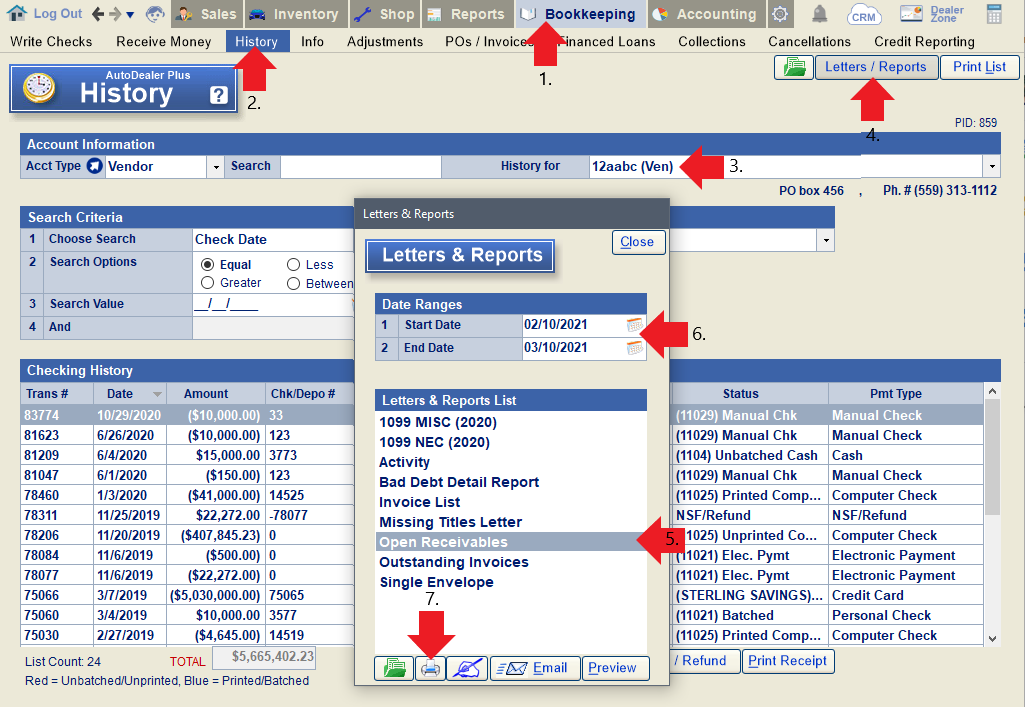
Use "Open Receivables" for vendors.
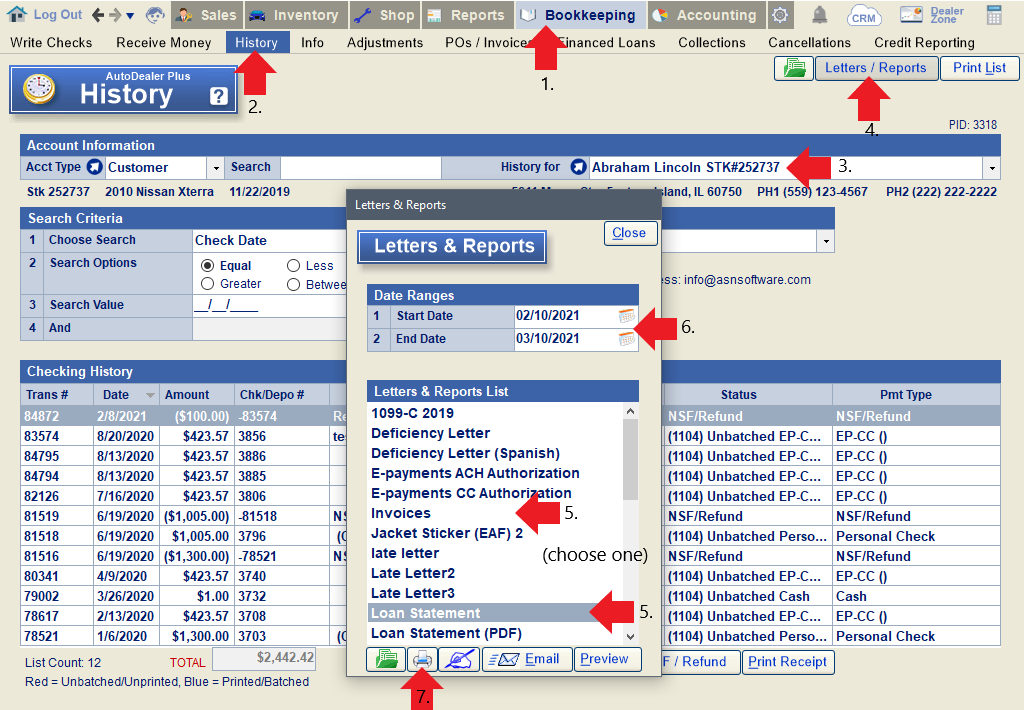
Use "Invoices" or "Loan Statement" for customers.
How do I process a bounced check?
How do I process a disputed e-payment?
In the case of an e-payment dispute, the money has already been withdrawn from your account, so you simply need to record that the money was refunded to the customer.
To do this, go to Bookkeeping > History. Load the customer's account. Select the transaction in question and click NSF/Refund. The system will warn you that you should continue only in the case of a dispute. Click "Yes" to proceed.
Enter the date the transaction was disputed and click "Ok".
Next, confirm the amount disputed and click "Ok".
You will now have a record that the payment was refunded to the customer, and the original invoice will be returned to outstanding invoices.
How do I refund an e-payment?
Load the customer/vendor you need to refund money to in Bookkeeping > Receive Money. Click the dollar sign icon on line 4 to open the E-Payment window.
Note: You can also do this from the Customer Deposit window in the Buyer screen, or in the Receive Money window of the Repair Order screen, if refunding a shop payment.
Navigate to the History tab and click on the payment you want to refund.
Click Void/Refund Payment.
Enter the amount to refund and click "Submit". The system will attempt to void the payment if it has not yet been charged to the customer's account. Otherwise, it will issue a refund.
Next, you need to apply the refund to the account. Return to the Receive Money screen and click "Pending Payments".
Note: For shop payments, use the Pending Payments button in the Work in Progress screen.
Locate the refund in the list of epayments needing processing and click "Apply Payment". (Note: If you do not see the refund, click "Refresh Now" to refresh the list.)
If you view the History tab for the customer, you will now see the refund listed in the checking history.
How do I refund an e-payment?
In order to refund an e-payment back to the original payment method (card or checking account), you need to access the client's e-payment history. To do this, first open the e-payment window associated with the customer. You can do this from the Receive Money screen or Customer Deposit window for sales clients, or from the Receive Money window in the Repair Order screen for shop clients. Just click the dollar sign icon next to "Deposit Type" on any of these screens (-make sure you have the correct client loaded).
Navigate to the History tab and select the payment you wish to refund.
Click "Void/Refund Payment".
Enter the amount you'd like to refund, and click "Submit".
The system will attempt to void the payment first (typically applicable if the payment was taken on the same day it is being refunded). If it cannot be voided, it will be refunded. The next message will indicate whether a void or refunded occurred.
How do I set up a new credit card chip reader/device?
If you are running e-payments through our integration with Chosen Payments and were provided with a chip/card reader to use, please follow these instructions to set up your new device.
First, turn on the device and connect it to Wi-Fi.
Next, navigate to the Customer Deposit window or the Receive Money screen. Choose a customer to receive money from. Enter the payment amount and choose "E-Payment" as the payment method. (The ASN E-Payments window will automatically pop up. You can close this.) Click "Save"/"Save Deposit".
Note: If you simply want to set up the device and do not wish to run an e-payment at this time, the easiest method is to enter a "Test" buyer in the Buyer screen (first and last name) and use the Customer Deposit window to enter a $1 deposit. You will not need to actually run the card.
The system will then open the "Process Payment" popup. Select the Chip/Card Reader button.
Click "New Device".
Enter the Device Key and Serial Number provided by Chosen Payments. (The serial number should also be written on the device.)
Enter a Device Nickname on line 3. (This is purely for your reference.)
Click the "LookUp" button. The system should automatically generate the API Key and Pin if the serial number of the device was entered correctly.
Click "Save" and then click "Make This My Default Device".
The device should now be successfully set up and ready to use with your DMS. Clicking the "Chip/Card Reader" button will now send the requested transaction to the device. You can then tap or insert the card to process the transaction.
How do I use the Text2Pay system to receive an e-payment from a customer?
The following example demonstrates how to use Text2Pay for a BHPH/financed loan customer, but the steps are generally the same when using this feature for any type of customer.
Load the account belonging to the customer from whom you want to receive a payment. Click the "Text2Pay" button at the top of the screen.
Choose the payment account you wish to charge from the list on the top-left of this window. Enter the amount to be charged on line 2, OR, select from the invoices to be paid on the right side of the screen and click "Use this Amt".
If desired, you may add a note to include with the text on line 3.
In the event of a sale/loan with more than one buyer, or a buyer with more than one phone number on file, you can select the buyer to be texted and the number to use on lines 4 and 5.
At the bottom of the window, you will see a preview of the text that will be sent. Click "Send" when ready.
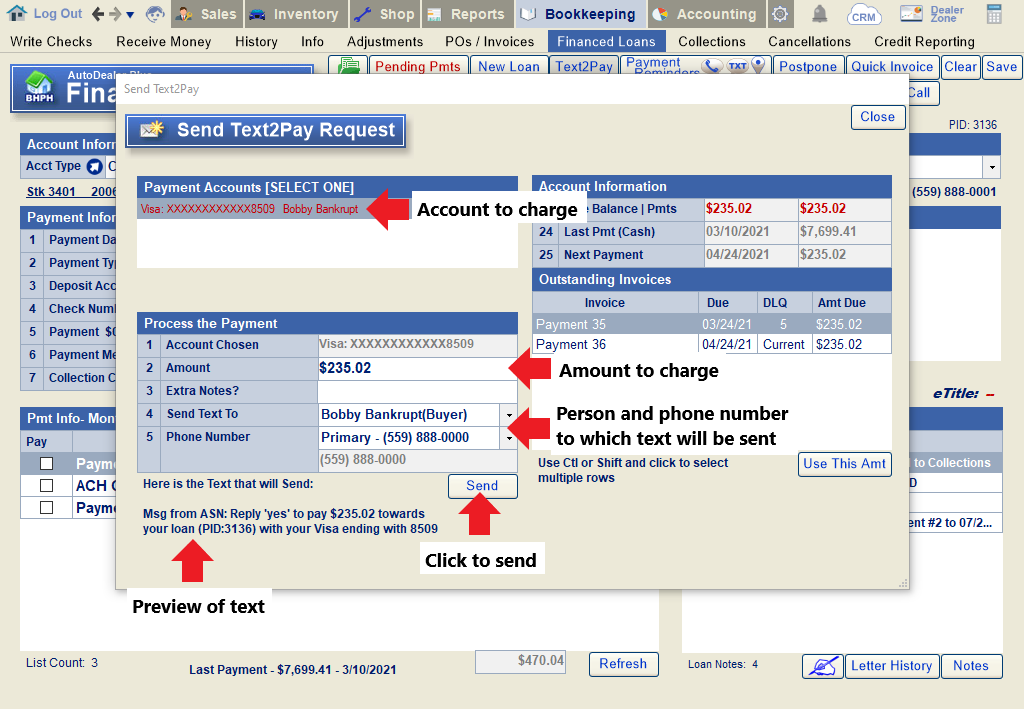
If the customer replies "Yes", their account will be charged as indicated. In some cases, you will then need to process the payment from the "Pending Payments" window in order for it to post to their account.
If you'd like to view the history of text correspondence with a customer, you can do so from the Buyer screen (in the Sales section) or the Info screen (in the Bookkeeping section). Click on the text bubble next to the customer's phone number. All texting history from Text2Pay transactions will be included.
Note that unless a customer responds to your Text2Pay message, you will not be able to send them a second request until 72 hours have elapsed.
How do I void a check or other transaction?
Go to Bookkeeping > History and load the account pertaining to the transaction you need to void. Locate the transaction in the checking history, highlight, and click "Edit Transaction".
With the invoice highlighted in the 'View/Edit Check' window, click "Void" at the top and then confirm that you wish to void the transaction.
Enter the reason for voiding and click "OK".
The window will show the details of the void in red. Click "Save" to finish voiding the transaction.
If you load the same account in the Write Checks or Receive Money screen (or the Financed Loans screen, where applicable), you will see the voided transaction has been returned to an outstanding invoice.
Note: You cannot edit transactions that have already been batched or locked by accounting.
How to I post a payment to a different account/PID than the one on which it was originally processed? (Accounting Locked)
Please Note: In the case of an e-payment, these instructions should only be used if the payment was processed on the correct credit card or checking account, but posted incorrectly. (Ex. A customer with two loans makes a payment, and you post the payment to the wrong loan.)
In the case of a recent payment that was posted to the wrong account, you can void the payment and re-post it to the correct account. If it was an e-payment, you will need to re-post it manually. However, if the mistake is caught at a later date after the accounting period has been locked, you have two options.
Option 1: Unlock the accounting temporarily to correct the transaction. In the case of a financed loan payment, this is the best option, although it may change your financials slightly.
Option 2: Debit the account where the payment was incorrectly applied, and credit the account where it should have been applied, without unlocking accounting. In the case of a financed loan payment, note that this will create a slight interest distribution discrepancy between the two accounts.
To do this, go to Bookkeeping > POs/Invoices. Choose "customer" as the account type and load the customer to whom the payment was originally applied. Use the blue arrow to generate an invoice number, and enter an invoice date as close to the actual payment date as possible. On line 1, enter the amount of the payment that was incorrectly applied. Add a description on line 2 that indicates why you are debiting one customer and crediting another; we recommend using the payment transaction number or e-payment reference number and including the PID on both customer accounts. Leave both the receivable account and offset account as 11050. On line 5, choose to offset to a customer, and then choose the customer to whom the payment should have been applied. Click "Add Line" and then click "Save".
Note: In this example we are assuming a customer has two separate accounts under the same name, and a payment was applied to the wrong account.
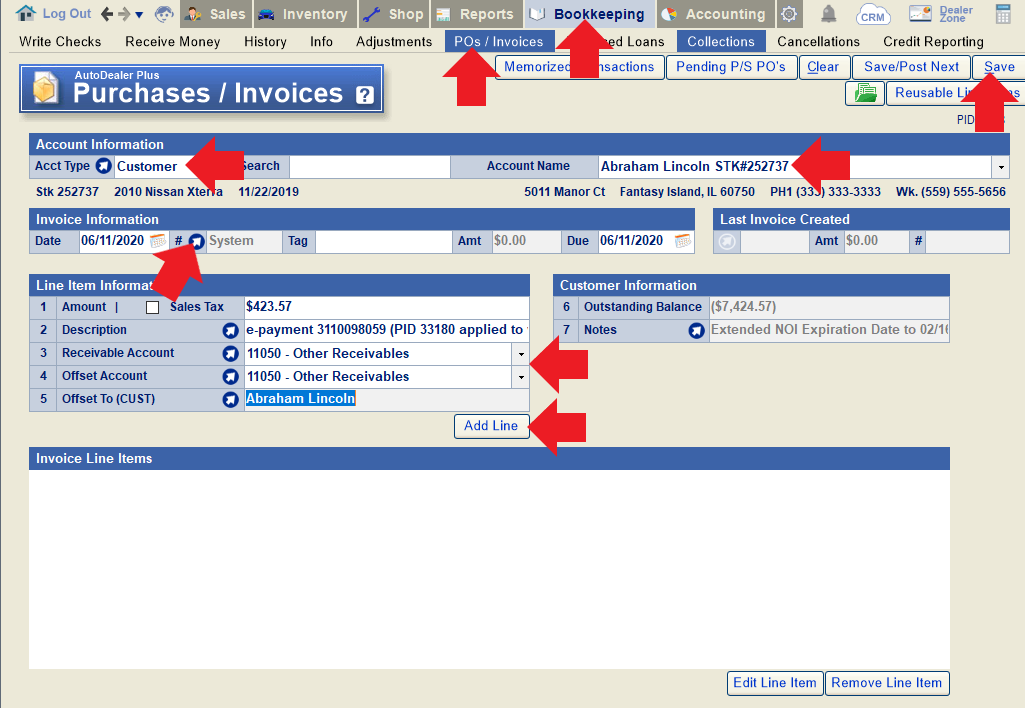
You will then have a receivable issued to the original customer for the amount that was incorrectly applied to their account, and a payable to the second customer to offset towards what was intended to be paid. To apply the credit, go to the Receive Money screen or Financed Loans screen (as applicable), load the second customer, and post a payment applied toward both the credit amount and an outstanding invoice, using "internal credit" as the payment method. Note that the credit amount should match the amount being applied to the outstanding invoices(s), so that the total nets out to "0". If the invoice amount is greater than the credit amount, you will need to do a partial payment on the invoice before applying the credit
Note: When posting this payment, it's best to use a date as close to when the money was originally received as possible.
I received an e-payment from a customer on the wrong account/loan. How can I fix it without refunding the e-payment?
Please note: These steps should ONLY be used if the payment was processed on the correct credit card or checking account. Otherwise, you will need to void the payment, refund the e-payment entirely, and start from scratch. If the payment was received prior to the accounting lock date, refer to this FAQ.
In some instances, you may have a repeat customer attached to more than one sale/loan in your system. Although there is only one customer, they are assigned a unique PID for each deal/loan. In the event that you receive a payment under the wrong PID, here is how you can post the payment to the correct PID in your system.
First, void the original payment in the History screen.
Go to Bookkeeping > History. Load the account on which you received the money. Highlight the payment that was received and click "Edit Transaction".
Click the "Void" button on the top-right of the popup. Confirm that you want to void the transaction, indicate the reason when prompted, and then click "Save".
You will be notified that the e-payment still exists; you have simply voided the transaction that was posted in the system, without voiding or refunding the actual payment.
Next, manually post the payment to the correct account.
Since the e-payment is attached to the incorrect PID, you will not be able to process it from the Pending Payments window.
Instead, go to Bookkeeping > Receive Money (or Bookkeeping > Financed Loans, for a financed loan account) and receive the same amount of money using "debit/credit card" or "other deposit" as the deposit type. Add a memo to indicate that the money was received as an e-payment under a different PID. Select the invoice to which the payment should have been applied, and click "Save".
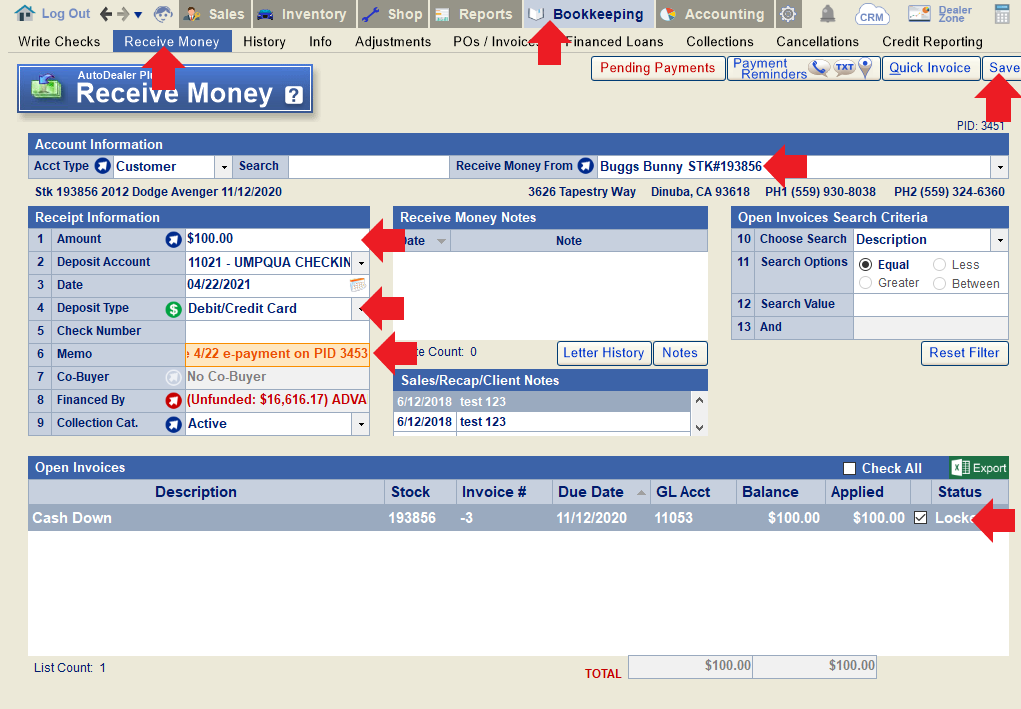
Finally, ignore the original e-payment in Pending Payments.
Open the Pending Payments window (from the Receive Money or Financed Loans screen), locate the e-payment that was originally received, and click "Ignore Payment". Because the payment was manually posted to the correct account in the prior step, we do not need to post it via pending payments (and doing so would double-post it). You will need to re-confirm that you want to ignore the payment and provide a reason (e.g. manually posted to correct PID XXX) to proceed.
When batching deposits, the manually-posted payment can be combined with the e-payment batch that includes the original (voided) payment.
What happens when a recurring payment (credit card or ACH) is declined or comes back as NSF?
When a recurring credit card payment is declined, you'll be notified in the Pending Payments window, under the "List of Recurring Payments that were DECLINED" section.
A full list of the customer's declined payments will also show in the "History" tab of the E-Payment window for the customer in question.
In most cases, the recurring setup will remain in place unless manually deactivated. In the case of dealers processing through TGate, the recurring payments will stop automatically.
When a recurring ACH payment gets charged back, the payment will post, but you'll also see an NSF in the "ACH Payments that are NSF" section of the Pending Payments window. You can highlight the chargeback and click "Process NSF" to post the NSF along with an (optional) NSF fee.
Just like credit card declines, NSFs will also show in the "History" tab of the E-Payment window for the associated customer.
The recurring ACH will continue running on schedule unless deactivated manually.
What is an IRS Form 8300 and how do I print one?
Per IRS rules, any person in a trade or business who receives more than $10,000 in cash in a single transaction or related transactions must complete a Form 8300. Accordingly, when you have reached this threshold for cash received by a single customer in the course of a year, the system will automatically prompt you to print a Form 8300. If you need to print the form at a later time, go to the History screen, load the customer in question, and click the "IRS 8300" button at the bottom of the screen.
From the popup, you can select any relevant transactions and preview/print the form.
In the case of a Financed Loan customer, you'll see a red note in the Financed Loan notes to alert you when a Form 8300 needs to be filed.