F.A.Q.'s and How-To's
How can I change the style of receipt generated by the system when a payment is received?
In Bookkeeping > History, load a customer from whom you've received a payment. Select a transaction from the checking history below and click "Print Receipt".
The default receipt style that shows is typically the "Laser" version. Click the "Switch Style" button to switch to the "Dot-Matrix" or "Thermal" receipt style. You will then need to close the preview and re-load the receipt in order to see the change in style take effect.
While each receipt style is specifically intended to print on a certain type of printer, they can all be printed on a laser printer.
Style changes are made on a per-computer basis, so the steps above must be repeated on every computer in your network, as needed.
Additional stylistic changes to receipts can be made in Settings (gear icon) > Defaults > Bookkeeping Defaults, on lines 47-53. Note that certain settings on this screen only apply to one or more of the above receipt styles. The "laser" receipt is the most customizable of the three.
Changes made to Receipt Defaults are company-wide, and will apply to all computers on your network.
How can I correct a payment that was posted incorrectly?
There are a number of ways to make corrections to a payment that was posted incorrectly. The exact method you should use will depend on specific circumstances.
If the payment was applied to the wrong invoice(s):
Follow the instructions for re-applying a payment.
Note: You can only re-apply the most recent payment received. Any other payment will need to be voided and re-posted.
If the deposit date, memo, or type was entered incorrectly:
Locate the payment in the History screen, select it, and click "Edit Transaction".
From here, you can manually adjust the date, memo, or deposit type on lines 5-7. Click the "Save" button when done.
Note: You cannot change the deposit type on an e-payment transaction. If an e-payment was taken on the wrong card, or from the wrong bank account, you will need to refund it and re-do the transaction correctly.
If a payment was received for the wrong amount:
Void the payment, and then re-do the transaction. In the case of an e-payment, you should either process a partial refund (if more money was received than intended), or process a second transaction (if less money was received than intended).
How can I re-apply a payment on a financed loan to different invoices?
In Bookkeeping > History, load the customer whose payment you need to re-apply. Locate the payment in the checking history, select it, and click "Edit Transaction".
Note: Only the most recent payment received on a loan can be re-applied.
In the View/Edit Deposit window, click "Re-Apply".
The system will load the payment in the Financed Loans screen; the invoices to which the payment were originally applied will be pre-selected. Select/unselect invoices as needed to choose the correct invoices to apply the payment towards. Then, click the "refresh" icon on line 5 to re-apply the money in the "To Be Paid" column. Click "Save" to finish re-applying the payment.
If you re-load the customer in the Financed Loans screen, you'll see a new note has been added in red to the Financed Loan Notes to show a record of the re-applied payment. Hover over the note line to see the details of the note, which will include the user who re-applied the payment, the date and time it was done, the transaction number, and the old and new breakdown of how the payment was applied.
How do I create a custom letter to send to customers?
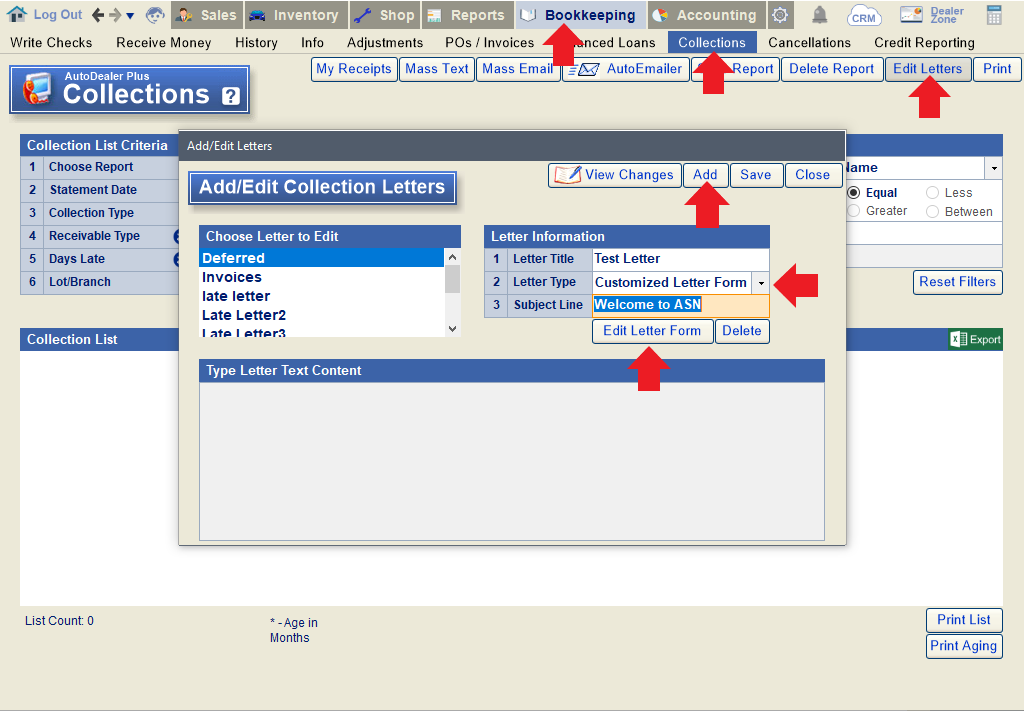
Go to Bookkeeping > Collections. Click the "Edit Letters" button at the top of the screen.
In the Add/Edit Collection Letters window, click "Add". Type in a name for the letter on line 1. To make a completely custom letter, choose "Customized Letter Form" on line 2. Then click "Edit Letter Form".
Tip: If you choose any other letter type on line 2, the system will generate a pre-made template corresponding to the letter type you select. You will be able to add custom text to insert within the template, but will not be able to edit the letter form. You can use line 3 to add a subject line that will print above your custom text.
Type your letter in the blank document. You can use the variables at the bottom of this window to automatically insert customer or loan information (please note that variables only work for BHPH/financed loan customers). For example, in the image below, "@Buyer1_FirstName" will insert the buyer's first name when printing this letter for a specific customer, and @PaymentAmount will insert the amount of the customer's loan payment. Use the formatting tools at the top of the screen to style the letter as desired. Click "Save & Close" to save your changes.
Click "Save" in the "Add/Edit Collection Letters" window to finish saving the custom letter. You can then close the window.
You will now be able to print this custom letter from the Log a Call window (accessible from the Financed Loans and Collections screens) or from the History screen (by clicking "Letters & Reports").
How do I edit the purchase transaction for a vehicle purchase that was entered as a quick payment entry?
When a vehicle purchase is inputted as a quick payment entry (via manual check) at the time the vehicle is added to your inventory, you will see the check details in the History screen for the purchase vendor but will not be able to edit the transaction from the History screen. The purchase amount listed on line 14 of the New Car Invoice popup (in the Inventory screen) will also be greyed out.
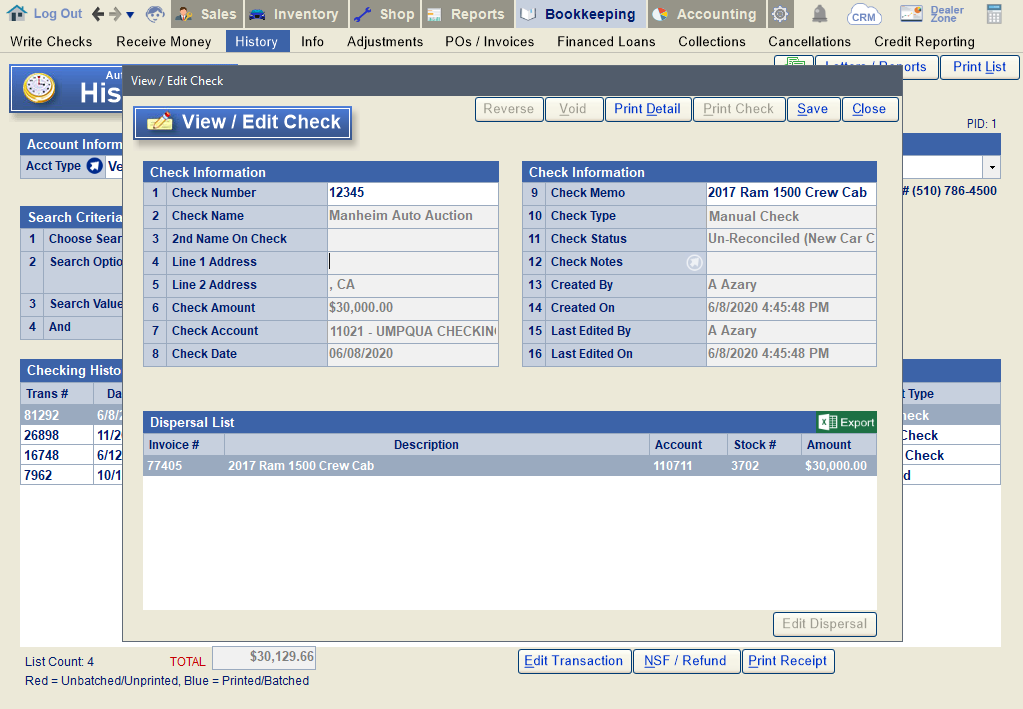
Check info is recorded, but only check # and memo can be edited here.
Instead, you will need to load the vehicle in the Inventory screen and edit the purchase transaction by clicking the blue arrow on line 61.
Change line 16 to "No" to remove the quick payment entry. Since you are now recording that the vehicle has not yet been paid for, you will need to select a liability account (typically 2110) on line 13. Click the "save" button to save your changes.
If you re-open the popup on line 61, you will now see that you can edit the purchase amount if needed.
If you load the Write Checks screen for the purchase vendor (you easily do this by clicking the arrow on line 23 of the Edit Inventory screen), you will see a new payable to the vendor for the purchase cost of the vehicle. At this point you can re-record the purchase transaction with the correct details.
How do I print a payment booklet for a financed loan customer?
How do I print a receipt after receiving money/posting payments?
If money was received in the Bookkeeping section (Receive Money screen or Financed Loans screen):
Go to Bookkeeping > History. Load the account towards which the payment was posted. Select the correct transaction in the Checking History below and click "Print Receipt".
If money was received in the Shop section (RO Screen):
Go to Shop > Repair Orders. Load the RO towards which money was received. Click the "Pmt History" button below line 33.
Select the correct transaction in the Payment History window and click "Print Receipt".
Note: By default, the system prompts you to print a receipt any time you receive money. If you are not getting prompted, this means you previously disabled these messages. Read this FAQ to learn how to reset them.
How do I print a statement or invoice?
Go to Bookkeeping > History. Load the account for which you want to print a statement/invoice. Click the Letters/Reports button on the top-right.
For vendors, choose "Open Receivables". For customers, choose "Invoices" or "Loan Statement" (for BHPH/financed loans). Set a date range on lines 1 & 2 and click the print icon.
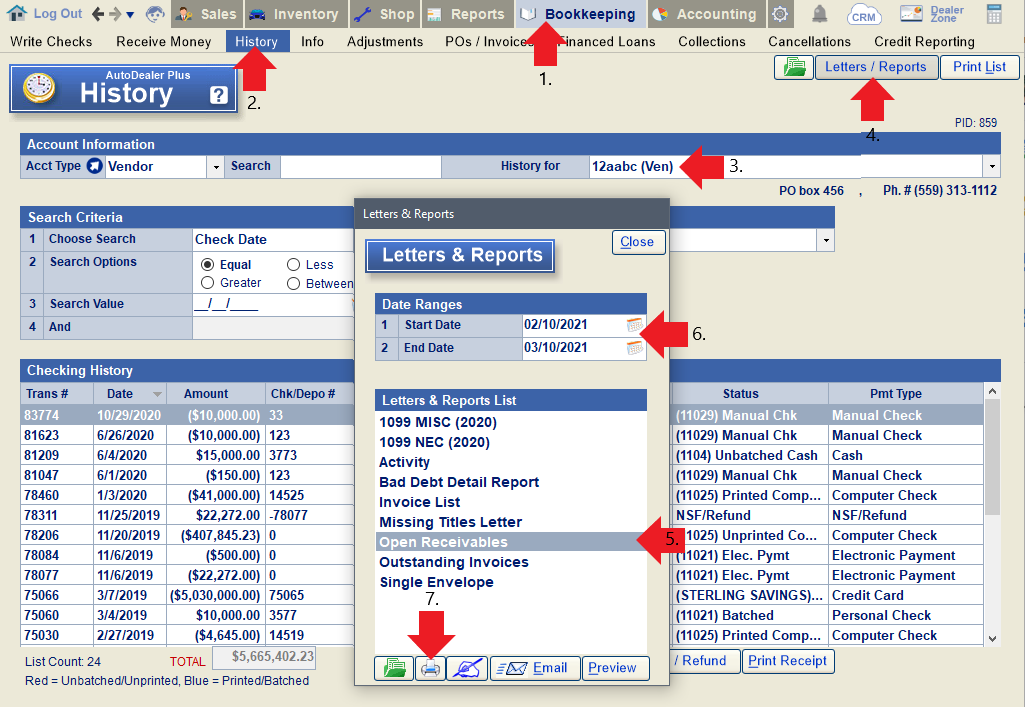
Use "Open Receivables" for vendors.
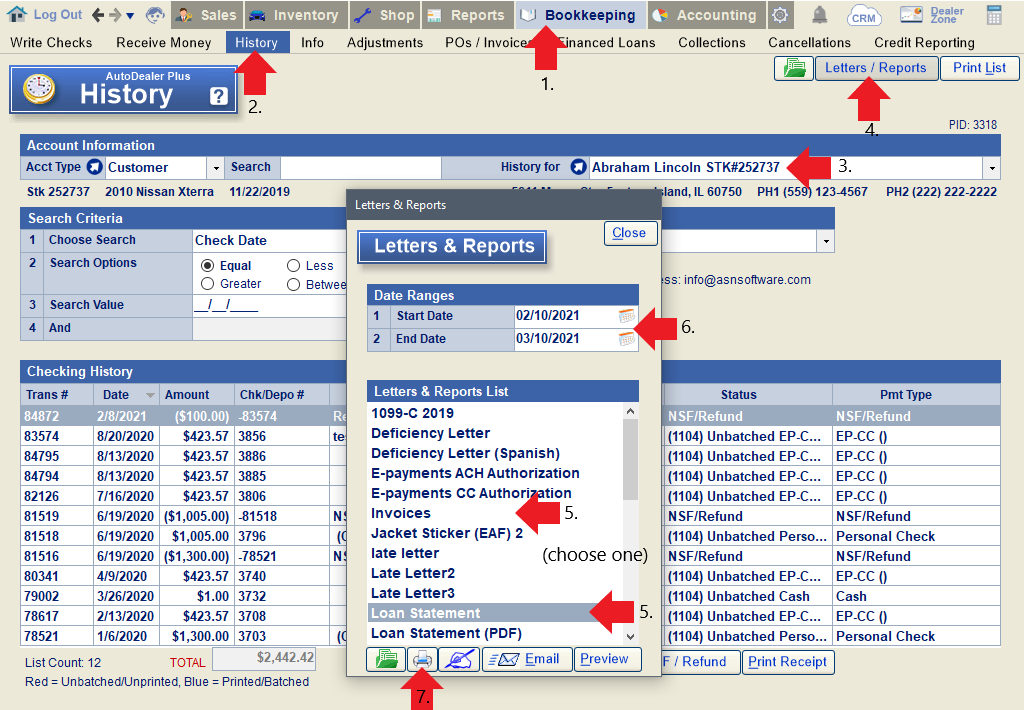
Use "Invoices" or "Loan Statement" for customers.
How do I process a bounced check?
How do I process a disputed e-payment?
In the case of an e-payment dispute, the money has already been withdrawn from your account, so you simply need to record that the money was refunded to the customer.
To do this, go to Bookkeeping > History. Load the customer's account. Select the transaction in question and click NSF/Refund. The system will warn you that you should continue only in the case of a dispute. Click "Yes" to proceed.
Enter the date the transaction was disputed and click "Ok".
Next, confirm the amount disputed and click "Ok".
You will now have a record that the payment was refunded to the customer, and the original invoice will be returned to outstanding invoices.
How do I refund an e-payment?
In order to refund an e-payment back to the original payment method (card or checking account), you need to access the client's e-payment history. To do this, first open the e-payment window associated with the customer. You can do this from the Receive Money screen or Customer Deposit window for sales clients, or from the Receive Money window in the Repair Order screen for shop clients. Just click the dollar sign icon next to "Deposit Type" on any of these screens (-make sure you have the correct client loaded).
Navigate to the History tab and select the payment you wish to refund.
Click "Void/Refund Payment".
Enter the amount you'd like to refund, and click "Submit".
The system will attempt to void the payment first (typically applicable if the payment was taken on the same day it is being refunded). If it cannot be voided, it will be refunded. The next message will indicate whether a void or refunded occurred.
How do I view voided transactions?
To view voided transactions by PID (specific customer, vendor, employee, or finance company) in the History screen:
Go to Bookkeeping > History. Load the account in question and checkmark the box on line 6 (Show Voided Items). The Checking History below will now show both complete AND voided transactions.
To view voided checks by checking account in the Check Register:
Go to Account > Check Register. Select the checking account on line 1 and change line 9 (Voided) to "Yes" (to view voided checks only) or "All" (to view all checks, including those voided). If needed, use lines 2-11 to filter the list down further. Applicable checks are listed below.
How do I void a check or other transaction?
Go to Bookkeeping > History and load the account pertaining to the transaction you need to void. Locate the transaction in the checking history, highlight, and click "Edit Transaction".
With the invoice highlighted in the 'View/Edit Check' window, click "Void" at the top and then confirm that you wish to void the transaction.
Enter the reason for voiding and click "OK".
The window will show the details of the void in red. Click "Save" to finish voiding the transaction.
If you load the same account in the Write Checks or Receive Money screen (or the Financed Loans screen, where applicable), you will see the voided transaction has been returned to an outstanding invoice.
Note: You cannot edit transactions that have already been batched or locked by accounting.
I printed a single check to pay for multiple transactions; why are the check details only showing one liability?
When a check is issued for multiple transactions posted under the same invoice number and stock number "0", the transactions will be lumped into a single liability in the check details. Below is an example of this.
In order to view the individual transactions, go to Bookkeeping > History. Load the vendor's name.
On line 5, select "Expenses". Then, change the search filter on line 1 to "invoice number". Enter the invoice number on line 3. The system will then display all expenses associated with that invoice number.
I received an e-payment from a customer on the wrong account/loan. How can I fix it without refunding the e-payment?
Please note: These steps should ONLY be used if the payment was processed on the correct credit card or checking account. Otherwise, you will need to void the payment, refund the e-payment entirely, and start from scratch. If the payment was received prior to the accounting lock date, refer to this FAQ.
In some instances, you may have a repeat customer attached to more than one sale/loan in your system. Although there is only one customer, they are assigned a unique PID for each deal/loan. In the event that you receive a payment under the wrong PID, here is how you can post the payment to the correct PID in your system.
First, void the original payment in the History screen.
Go to Bookkeeping > History. Load the account on which you received the money. Highlight the payment that was received and click "Edit Transaction".
Click the "Void" button on the top-right of the popup. Confirm that you want to void the transaction, indicate the reason when prompted, and then click "Save".
You will be notified that the e-payment still exists; you have simply voided the transaction that was posted in the system, without voiding or refunding the actual payment.
Next, manually post the payment to the correct account.
Since the e-payment is attached to the incorrect PID, you will not be able to process it from the Pending Payments window.
Instead, go to Bookkeeping > Receive Money (or Bookkeeping > Financed Loans, for a financed loan account) and receive the same amount of money using "debit/credit card" or "other deposit" as the deposit type. Add a memo to indicate that the money was received as an e-payment under a different PID. Select the invoice to which the payment should have been applied, and click "Save".
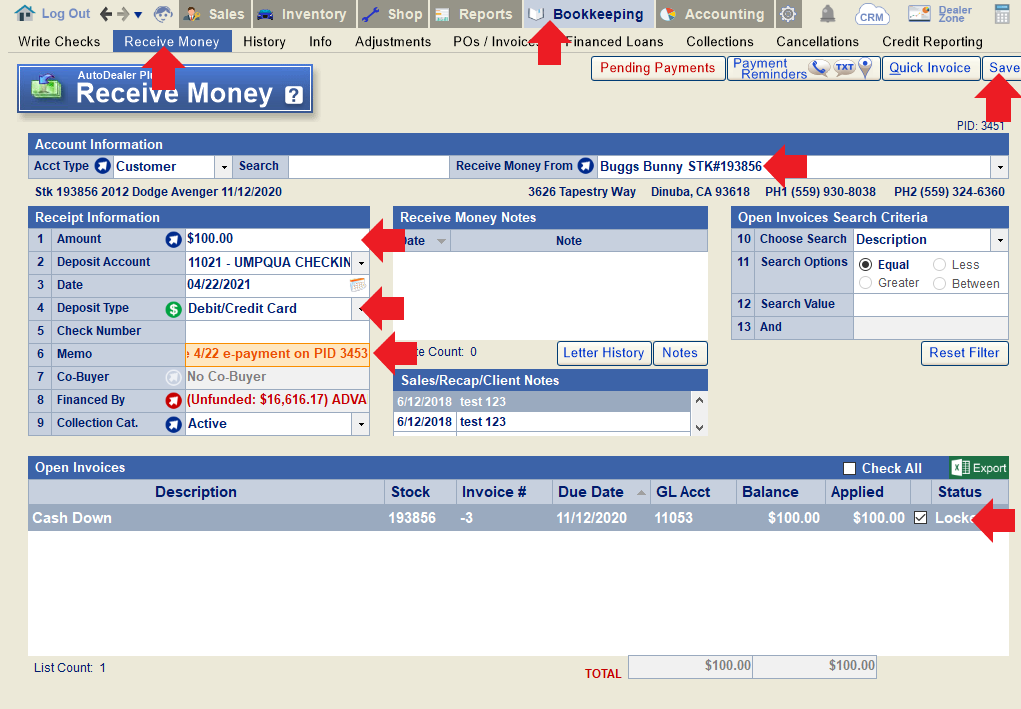
Finally, ignore the original e-payment in Pending Payments.
Open the Pending Payments window (from the Receive Money or Financed Loans screen), locate the e-payment that was originally received, and click "Ignore Payment". Because the payment was manually posted to the correct account in the prior step, we do not need to post it via pending payments (and doing so would double-post it). You will need to re-confirm that you want to ignore the payment and provide a reason (e.g. manually posted to correct PID XXX) to proceed.
When batching deposits, the manually-posted payment can be combined with the e-payment batch that includes the original (voided) payment.
What is an IRS Form 8300 and how do I print one?
Per IRS rules, any person in a trade or business who receives more than $10,000 in cash in a single transaction or related transactions must complete a Form 8300. Accordingly, when you have reached this threshold for cash received by a single customer in the course of a year, the system will automatically prompt you to print a Form 8300. If you need to print the form at a later time, go to the History screen, load the customer in question, and click the "IRS 8300" button at the bottom of the screen.
From the popup, you can select any relevant transactions and preview/print the form.
In the case of a Financed Loan customer, you'll see a red note in the Financed Loan notes to alert you when a Form 8300 needs to be filed.