F.A.Q.'s and How-To's
A Comprehensive Guide to ASN's E-Payment Feature?
1. What is the ASN ePayment feature?
ASN’s ePayment feature allows you to efficiently collect
customer payments using various methods, including credit cards and ACH
transactions. This feature streamlines the payment process, ensuring fast and
secure transactions.
2. What payment methods are supported?
ASN ePayment supports:
- Credit
Cards: Customers can pay using their saved credit card information or
enter new card details.
- ACH
Transactions: You can convert checks into ACH transactions for direct
bank payments.
3. How can I request a payment from a customer?
You can request payments through several methods:
4. How do I capture payments using a credit card
terminal?
You can send a command directly to your credit card terminal
to capture the payment:
- Complete
the transaction on the terminal.
- The
customer will swipe or insert a chip card to confirm and authorize the
payment.
- The
system will automatically update, reflecting the completed transaction for
bookkeeping needs.
5. How can I manage payments through multiple screens?
ASN’s ePayment feature allows you to handle payments across
multiple screens:
- Client
Tab: Use the Customer Deposit option to select the payment method and
process the payment.
- Bookkeeping:
In the Receive Money or Finance Loans screen, utilize various features to
receive and record the payment.
6. Are there similar features for service shops?
Yes, the Service Shop Module offers similar payment
features, including payment processing, invoice management, and text-to-pay
options.
7. What if I have many financed loans?
ASN also provides the ASNPayment feature, which
allows ePayments to be set up and originated by your customers.
8. How can I ensure the process is efficient?
ASN ePayment is designed for speed and efficiency:
- Quick
Access: Payments can be processed in just a few clicks.
- Real-Time
Updates: All transactions are updated in real-time, ensuring your
records are always accurate.
Watch this recording to learn more about ASN ePayment
features:
How can change the primary buyer on a financed loan, or remove a buyer from the loan completely?
Go to Bookkeeping > Info. Load the buyer in question.
Click the "All Buyers" button.
To make a buyer the primary buyer, select their name in the popup window and click "Set as Primary".
To remove a buyer from the loan, select their name and click "Remove Completely".
Note: If you wish to remove the primary buyer on the loan, you must first set the co-buyer as the primary buyer, and then remove the original primary buyer.
How can I add or make changes to a buyer on a financed loan?
To add a new buyer:
Load the current buyer in Bookkeeping > Info. Use the "Add a Co-Signer" button or "Add a Co-Buyer" button to add another person to the loan. Changes to the new buyer will be automatically saved.
To change the primary buyer:
Load the current primary buyer in Bookkeeping > Info. Click "All Buyers". Select the co-buyer or co-signer whom you want to make the primary buyer and click "Set as Primary". Changes will be saved automatically.
To remove a buyer:
Load the buyer in Bookkeeping > Info. Click "All Buyers". Select the buyer you would like to remove and click "Remove Completely". Changes will be saved automatically.
Note: You cannot remove the primary buyer. If you need to do so, first follow the steps above to set a new primary buyer, and then remove the old primary buyer.
Any other changes to a buyer's general information can be done on this screen and will be saved automatically.
How can I change or remove the repo fees on a repossession?
How can I change the payment due date on a financed loan customer?
Note: These instructions are for adjusting the payment due date on a loan after one or more payments have already been received. If no payments have been received on the account, load the sale/loan on the Deal screen, adjust the first payment due date there, and then re-save. If you need to change the rate, term, or payment amount on a loan, follow the instructions for loan modifications.
Load the customer in the Financed Loans screen. Click on the arrow next to "Curr. Due Date" on line 12. You can choose to change either the next payment due date (changes the payment listed on line 1 of the popup only) or all future payments' due dates (moves all payments forward by an equal amount). You can extend the due date by a certain number of days, or change the days of the month that semi-monthly payments are due. You can also choose to add extension fees. Press "Save" to complete the changes.
Note: If you choose to extend all payment dates, the system will generate a Loan Extension Disclosure Statement for the customer to sign. If you have not purchased this contract, you will be asked if you want to navigate to the DealerZone to purchase it.
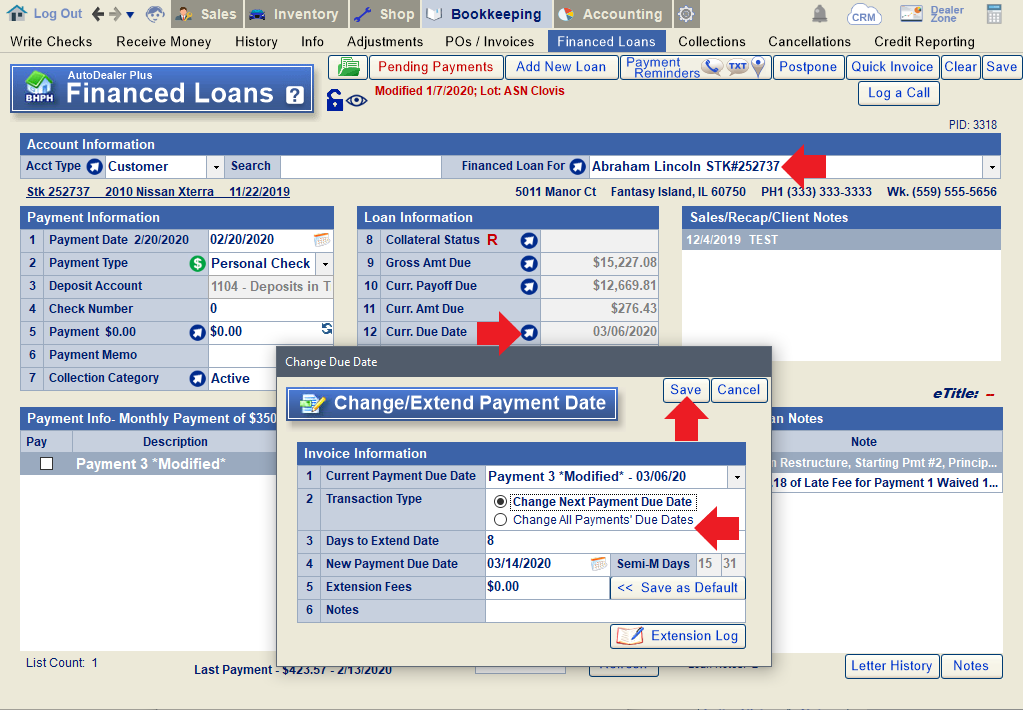
Once an extension has been made, you'll see a note regarding the extension in the Financed Loan Notes and a notation next to the "Current Due Date" label on line 12.
You can also see a log of all extensions by opening the Change/Extend Payment Date popup using the arrow on line 12 and clicking the "Extension Log" button.
How can I close a BHPH/in-house loan that's being refinanced?
1. Load the account in the Financed Loans screen and click the blue arrow on line 9 to open the Loan Status/Pay Off Summary window.
2. Click the Pay Off/Inactivate button and confirm that you want to mark the in-house loan as payed off.
3. Enter the inactivation date when prompted, and choose "Client-Refi" as the reason. Then click "Save".
4. The system will then ask if the deal is being re-financed. Click "Yes". You will also be asked to input a ledger date, which will default to the inactivation date entered in step 3.
5. When prompted, select the finance company that is re-financing the loan.
The system will automatically create a receivable from the new finance company for the payoff amount, minus any late fees, which will remain as receivables from the customer. Both can be found in Bookkeeping > Receive Money, under the corresponding accounts.
How can I correct a payment that was posted incorrectly?
There are a number of ways to make corrections to a payment that was posted incorrectly. The exact method you should use will depend on specific circumstances.
If the payment was applied to the wrong invoice(s):
Follow the instructions for re-applying a payment.
Note: You can only re-apply the most recent payment received. Any other payment will need to be voided and re-posted.
If the deposit date, memo, or type was entered incorrectly:
Locate the payment in the History screen, select it, and click "Edit Transaction".
From here, you can manually adjust the date, memo, or deposit type on lines 5-7. Click the "Save" button when done.
Note: You cannot change the deposit type on an e-payment transaction. If an e-payment was taken on the wrong card, or from the wrong bank account, you will need to refund it and re-do the transaction correctly.
If a payment was received for the wrong amount:
Void the payment, and then re-do the transaction. In the case of an e-payment, you should either process a partial refund (if more money was received than intended), or process a second transaction (if less money was received than intended).
How can I edit or remove a fee for ACH or Credit Card transactions?
When convenience fees are set up for credit card or ACH transactions in Bookkeeping Defaults, the system will automatically add (or prompt you to add) the fee when receiving an e-payment. If you are given a prompt and do not wish to charge the convenience fee, you can simply click "No" and the fee will not be added.
Tip: If you do not see this prompt, this would indicate that, at some point, you disabled this popup. Follow these instructions to reset all system prompts if desired.
If the convenience fee has already been added and you want to remove it, simply un-check it in the Receive Money screen, or right-click to waive it in the Financed Loans screen.
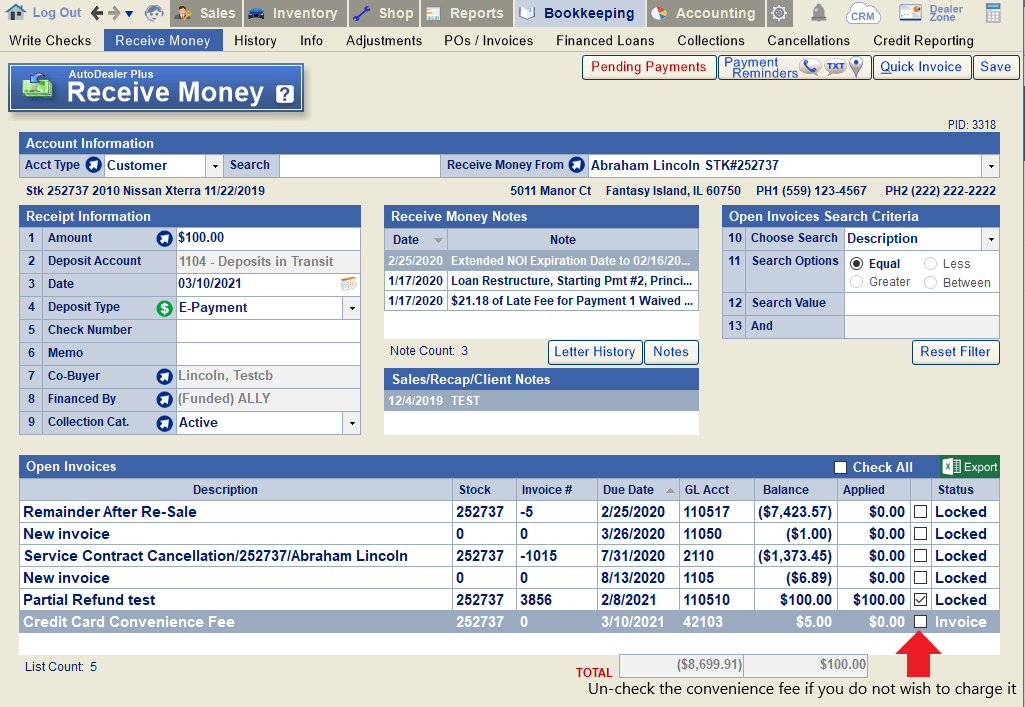
Uncheck the convenience fee in the Receive Money screen. The system will remove the invoice once the payment has been saved.
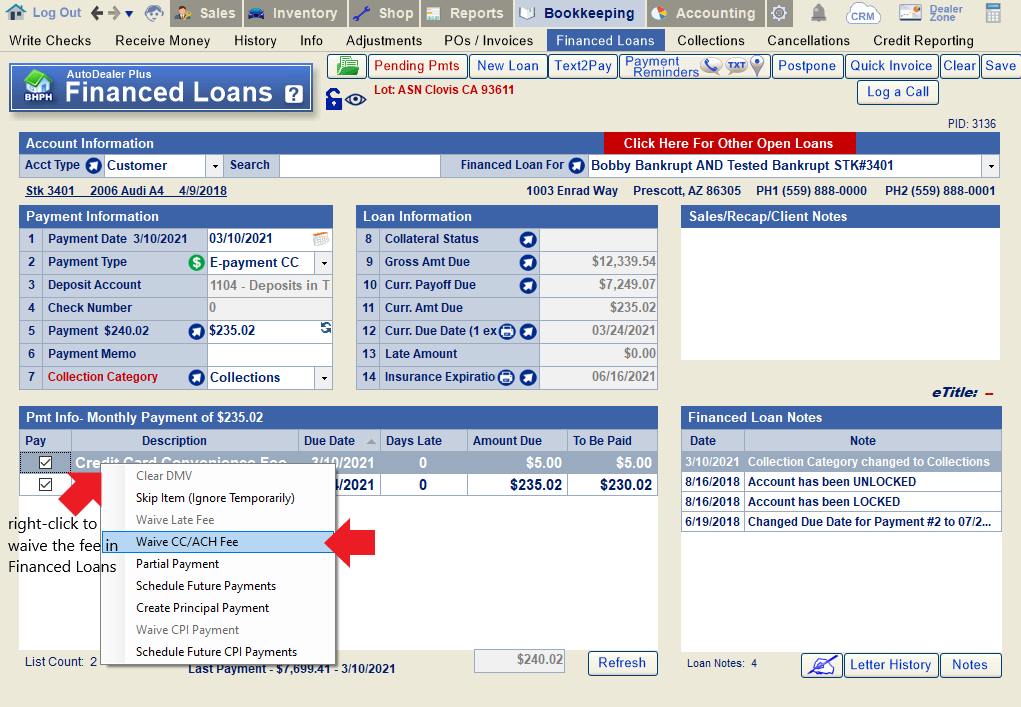
Right-click to waive the fee in the Financed Loans screen.
To edit, the convenience fee, right-click and choose "Partial Payment". Enter the amount to charge and click "Ok"/"Save". Finish processing the payment as you normally would. The remaining amount of the invoice will be automatically deleted once the payment is saved.
Note: The default fee can be edited in Bookkeeping Defaults.
How can I get a payoff quote on a financed loan?
How can I lock or unlock a customer's access to their online payment center account?
How can I order a repossession on a vehicle?
Load the loan for the vehicle you want to repossess in Bookkeeping > Financed Loans and click the arrow button on line 8 to load the vehicle into the Collateral Management screen.
Alternatively, you can go directly to Inventory > Collateral Management and search for the account you want to repossess.
Click "Order a Repo". Fill out lines 1-3 and select "Save Repo Order". After saving, you can also print the Repo Order by clicking "Print Order".
How can I postpone a payment for a financed loan customer?
Note: Postponing a payment creates a balloon payment due at the end of the original loan term. If you simply wish to extend the term of the loan by deferring the due date of certain payments, you should do an extension instead. The example below assumes that your desired outcome is a balloon payment.
To postpone one or more payments:
Load the customer in the Financed Loans screen and click the "Postpone" button on the top-right.
In the popup, enter the reason for postponement and amount to postpone. Then click "save".
The system should automatically change the deposit type on line 2 to "Other Deposit" and select the postponement along with the applicable invoices to offset. Click "save" to offset the current receivables and finalize the postponement.
If you load the customer back onto the Financed Loans screen, you'll see a new note added to the Financed Loan Notes regarding the postponement.
You can also load the customer in the History screen and filter by postponements on line 5 to see the postponement history.
How can I postpone payments that are not yet due for a financed loan customer?
Note: Postponing a payment creates a balloon payment due at the end of the original loan term. If you simply wish to extend the term of the loan by deferring the due date of certain payments, you should do an extension instead.
To Postpone Future Payments:
With the customer loaded in the Financed Loans screen, right-click anywhere in the blank area of the "Payment Info" section and click "Schedule Future Payments".
Choose the number of future payments to schedule and click "ok".
At this point you will see the requested number of future payments generated, and can postpone the payment(s) as usual.
Note: You must postpone the payments before switching screens; future payments will be removed from the screen once the screen is refreshed.
How can I print the payment history for a financed loan customer?
How can I re-activate a loan that was previously inactivated?
How can I re-apply a payment on a financed loan to different invoices?
In Bookkeeping > History, load the customer whose payment you need to re-apply. Locate the payment in the checking history, select it, and click "Edit Transaction".
Note: Only the most recent payment received on a loan can be re-applied.
In the View/Edit Deposit window, click "Re-Apply".
The system will load the payment in the Financed Loans screen; the invoices to which the payment were originally applied will be pre-selected. Select/unselect invoices as needed to choose the correct invoices to apply the payment towards. Then, click the "refresh" icon on line 5 to re-apply the money in the "To Be Paid" column. Click "Save" to finish re-applying the payment.
If you re-load the customer in the Financed Loans screen, you'll see a new note has been added in red to the Financed Loan Notes to show a record of the re-applied payment. Hover over the note line to see the details of the note, which will include the user who re-applied the payment, the date and time it was done, the transaction number, and the old and new breakdown of how the payment was applied.
How can I restock a repossessed vehicle?
Load the repo in the Collateral Management screen.
Once the NOI on the repossession has expired (see date on line 13), you will be able to click "Ready For Sale". When prompted by the system to mark the vehicle as sold or restocked, click "Yes".
Click "Restock Vehicle". Enter the restock information and click "Save Restock". The system will prompt you to confirm the restock; click "Yes" to proceed. The account will be inactivated and the restock value will be deducted from the customer's balance.
How can I restrict certain deposit types when receiving money in the system?
How can I sell a vehicle I repossessed?
Load the repo in the Collateral Management screen.
Once the NOI on the repossession has expired (see date on line 13), you will be able to click "Ready For Sale". When prompted by the system to mark the vehicle as sold or restocked, click "Yes".
Click "Sold At Auction". Fill out the information for the sale and click "Save Resale". The system will ask you whether you are sure you want to mark the vehicle as "Sold at Auction". Click "Yes" to proceed. This will create a receivable from the auction/buyer and credit the customer's account.
If needed, you can then click "Auction Info" > "Sales Documents" to print a Bill of Sale.
Caution: Each State might have different 'Sales Documents'. If you do not find the documents you need, please contact ASN customer support.
How can I undo a repo?
To undo a repo on a vehicle that has not yet been sold at auction or re-stocked, go to Bookkeeping > Financed Loans and click the arrow on line 8 (Collateral Management) to load the repo.
Alternatively, you can go directly to Inventory > Collateral Management, and search for the repo, or load it by stock#, VIN#, or PID.
Click "Undo Repo" and confirm that you want to undo the repossession.
How can I view extension details on a loan that was previously extended?
How can I view the history of letters sent to a customer?
Letter history is accessible from the "Log a Call" window, which can be opened from the Financed Loans screen or the Collections screen.
From the Financed Loans screen:
Go to Bookkeeping > Financed Loans. Load the account of the customer in question. Click the "Log a Call" button on the top-right of the screen.
From the Collections screen:
Go to Bookkeeping > Collections. Load an existing collections report on line 1, or use the filters to generate a new report based on your desired criteria. (Don't forget to click the Produce/Refresh Report" button if needed to apply filters.)
Double-click on any customer in the list below to load the Log a Call screen for that customer.
Once in the Log a Call window:
You can then navigate to the "Letter History" tab to see a record of letters sent to the customer.
How can we set up e-payments to post automatically?
How do I modify a financed loan to change the loan term or rate, or otherwise adjust the payment amount?
Note: These instructions are for adjusting the loan term, rate, or payment amount after one or more payments have already been received. If no payments have been received on the account, load the sale/loan on the Deal screen, adjust the term, rate, or payment amount as needed, and then re-save. If you simply need to change one or more payment due dates on a loan, follow the instructions for payment extensions.
Open the Financed Loans screen and right-click on the "Collateral Status" label on line 8. Click "Modify this Loan".
Enter the modification date (new loan date) on line 2. The system will provide the date after the last payment was made, which is typically the most logical date to use. Hit the "Enter" key to unlock the remaining fields in the popup.
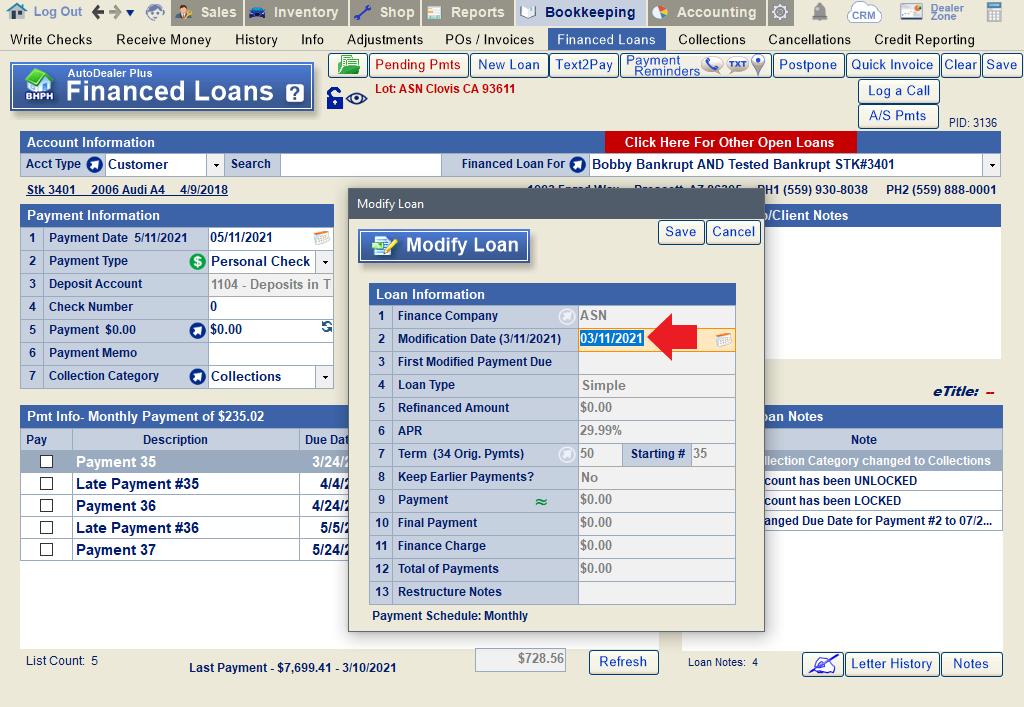
Enter the first (new) payment due date on line 3. Enter the desired APR on line 6, and the term for the modified loan on line 7. The system will indicate how many payments have already been made. In this example, the original term was 84 months, and 34 (original) payments have already been made. If we did not wish to change the term of the loan, we would keep the new term at 50 (50+34=84). You may also click the blue arrow on line 7 to change the payment frequency.
On line 8, choose whether you want to retain any past due payments before completing the modification. If "no" is selected, past due payments will be voided and recalculated based on the modification.
The system will automatically calculate the payment amount, final payment, finance charge, and total payments on lines 9-12.
Alternatively, you can enter a desired monthly payment on line 9, and have the system automatically adjust the rate, term, and/or final payment to accommodate.
Click the "Save" button to finish modifying the loan.
Note: Modifying a loan is irreversible!
The system will automatically generate a modification agreement. You can access this at any time by clicking on the "R" icon on line 8 to open the Modification History popup. From here you can print or e-sign the modification agreement.
The system will also generate a note about the restructured loan in the "Financed Loan Notes" section.
How do I post a payoff on a financed loan?
How do I post an overpayment for a payoff on a financed loan?
Load the account in Bookkeeping > Financed Loans. Enter the payment information as usual in lines 1-6. On line 5, enter the actual amount the customer paid towards the payoff.
The system will warn you that the payment exceeds the payoff amount, and ask if you want to add a payable back to the customer for the difference. Click "Yes" to continue.
If the amount being paid exceeds the current invoices in the list, you'll be asked to apply the balance to future payments or the principal. Enter the balance on line 7 (Additional Principal). Then click "Save".
The system will automatically apply the payment towards any open invoices + the principal, and the overpayment will go towards an "excess payment refund" that will be payable to the customer after payoff. Click "save" to process the payment.
To refund the overpayment to the customer, go to Bookkeeping > Write Checks, and load the customer's account. You will already see a payable to the customer for the excess payment amount. Checkmark the box next to the invoice and click the arrow on line 5 to load the invoice amount. Fill out the remaining payment information as usual on lines 1-6 and click "save & print now" to print a computer check, or "save" if using a different payment method.
How do I post an overpayment on a financed loan?
Load the customer/loan in question in Bookkeeping > Financed Loans. Enter the payment details as usual on lines 1-6, entering the amount the customer is paying on line 5.
The system will warn you that the payment amount exceeds all invoices in the list. Click "ok" to proceed.
Choose whether you want to apply the overpayment amount to future payments or the principal, and enter the amount in the appropriate field. Then click "save".
The system will automatically generate a new invoice for the next payment or principal payment (depending on what you chose in the last step) and apply the overpayment amount to that invoice. Click "save" to post the payment to the customer's account.
How do I print a payment booklet for a financed loan customer?
How do I print a receipt after receiving money/posting payments?
If money was received in the Bookkeeping section (Receive Money screen or Financed Loans screen):
Go to Bookkeeping > History. Load the account towards which the payment was posted. Select the correct transaction in the Checking History below and click "Print Receipt".
If money was received in the Shop section (RO Screen):
Go to Shop > Repair Orders. Load the RO towards which money was received. Click the "Pmt History" button below line 33.
Select the correct transaction in the Payment History window and click "Print Receipt".
Note: By default, the system prompts you to print a receipt any time you receive money. If you are not getting prompted, this means you previously disabled these messages. Read this FAQ to learn how to reset them.
How do I print a statement or invoice?
Go to Bookkeeping > History. Load the account for which you want to print a statement/invoice. Click the Letters/Reports button on the top-right.
For vendors, choose "Open Receivables". For customers, choose "Invoices" or "Loan Statement" (for BHPH/financed loans). Set a date range on lines 1 & 2 and click the print icon.
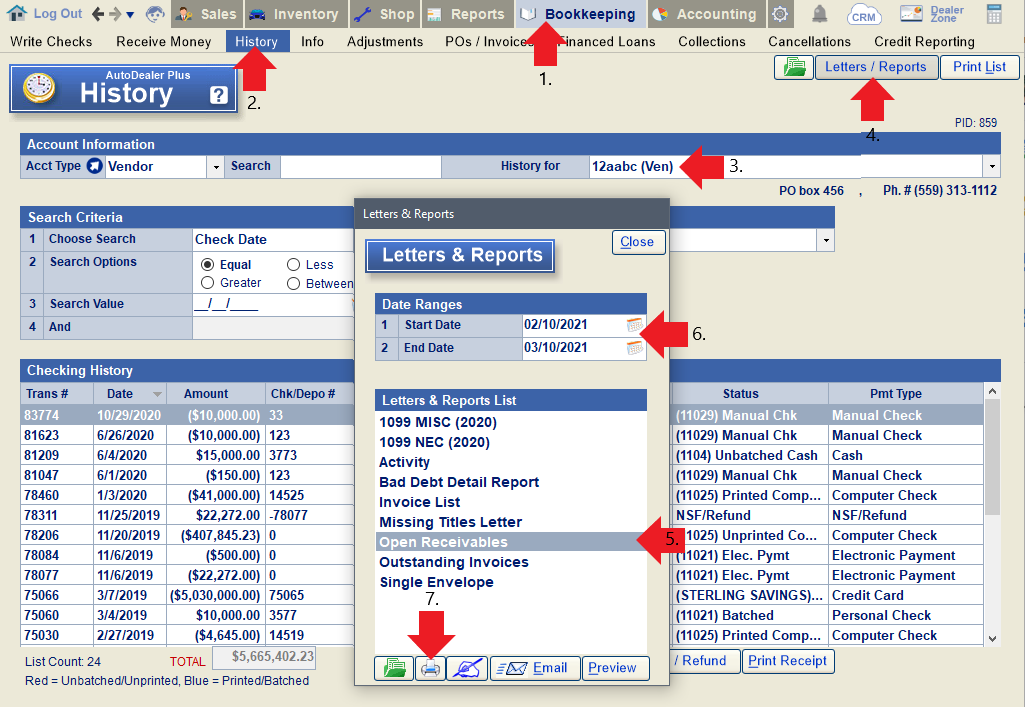
Use "Open Receivables" for vendors.
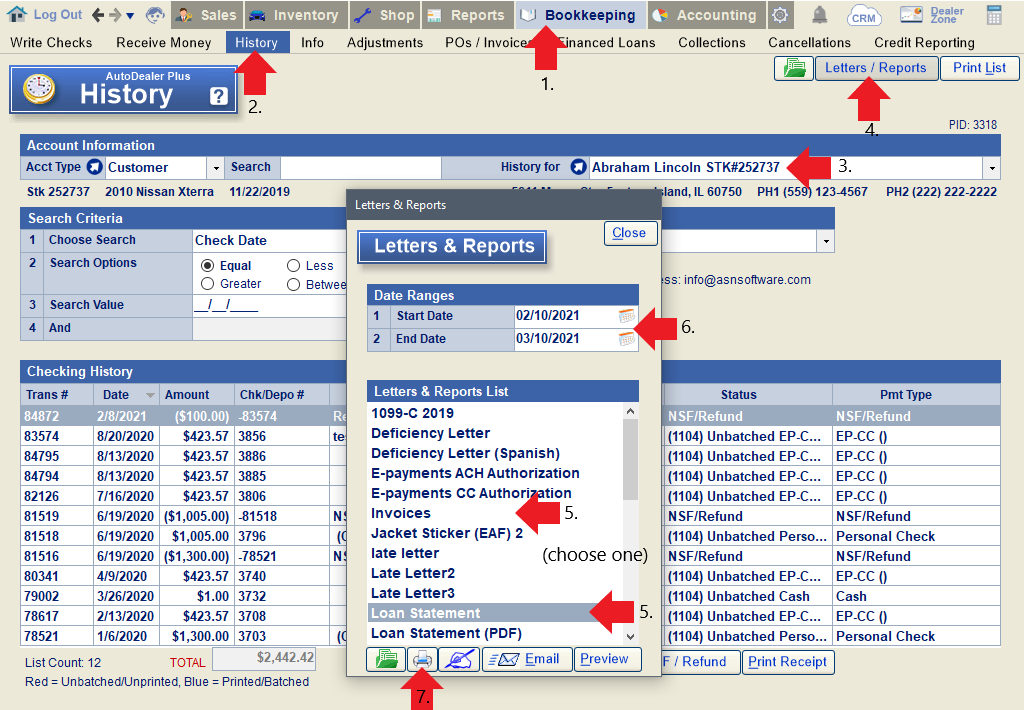
Use "Invoices" or "Loan Statement" for customers.
How do I process a bounced check?
How do I process a disputed e-payment?
In the case of an e-payment dispute, the money has already been withdrawn from your account, so you simply need to record that the money was refunded to the customer.
To do this, go to Bookkeeping > History. Load the customer's account. Select the transaction in question and click NSF/Refund. The system will warn you that you should continue only in the case of a dispute. Click "Yes" to proceed.
Enter the date the transaction was disputed and click "Ok".
Next, confirm the amount disputed and click "Ok".
You will now have a record that the payment was refunded to the customer, and the original invoice will be returned to outstanding invoices.
How do I repossess a vehicle?
How do I use the tag system for financed loans? (Finance Companies Only)
Tags in the Financed Loans screen can be used to categorize loan accounts and/or draw attention to important notices when an account is loaded. For example, you might add a tag for "Title Received" to keep track of loans for which the title has already been received.
To manage the list of tags available in the Financed Loans screen, click anywhere in the "Tags and Sales Notes" section and choose "Tag Management".
From the Tag Management window, you can add to, edit, or delete from the list of available tags. When adding a tag, enter the name of the tag on line 1 (ex. Title Received). Add a color for the tag on line 3, and set a priority level for the tag on line 4 (0 being the highest possible priority). On line 4, you can also choose whether you want the tag to be turned into a popup alert every time a financed loan with that tag is loaded. Use the "save changes" button to finish adding or editing.
To apply a tag to a financed loan, click inside the Tags & Sales Notes section, select "Add a Tag", and then choose the tag you'd like to add. It will then show up in the Tags & Sales Notes section when that loan is loaded on the Financed Loans screen.
How do I use the Text2Pay system to receive an e-payment from a customer?
The following example demonstrates how to use Text2Pay for a BHPH/financed loan customer, but the steps are generally the same when using this feature for any type of customer.
Load the account belonging to the customer from whom you want to receive a payment. Click the "Text2Pay" button at the top of the screen.
Choose the payment account you wish to charge from the list on the top-left of this window. Enter the amount to be charged on line 2, OR, select from the invoices to be paid on the right side of the screen and click "Use this Amt".
If desired, you may add a note to include with the text on line 3.
In the event of a sale/loan with more than one buyer, or a buyer with more than one phone number on file, you can select the buyer to be texted and the number to use on lines 4 and 5.
At the bottom of the window, you will see a preview of the text that will be sent. Click "Send" when ready.
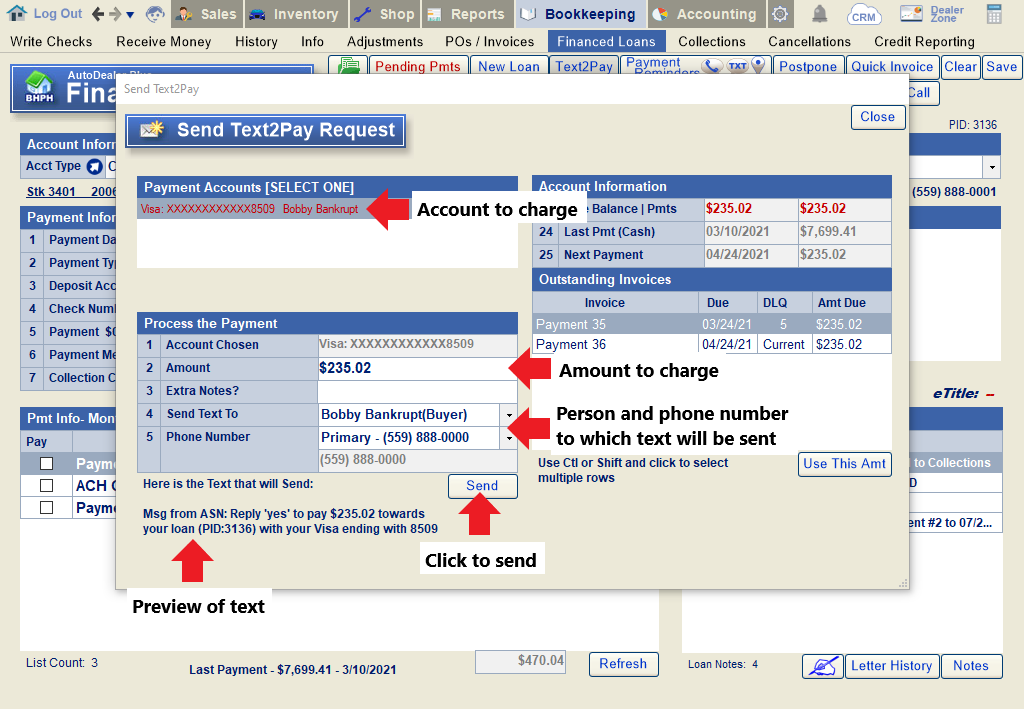
If the customer replies "Yes", their account will be charged as indicated. In some cases, you will then need to process the payment from the "Pending Payments" window in order for it to post to their account.
If you'd like to view the history of text correspondence with a customer, you can do so from the Buyer screen (in the Sales section) or the Info screen (in the Bookkeeping section). Click on the text bubble next to the customer's phone number. All texting history from Text2Pay transactions will be included.
Note that unless a customer responds to your Text2Pay message, you will not be able to send them a second request until 72 hours have elapsed.
How do I view the modification details/modification agreement for a loan that has been modified?
How do I write off a BHPH/financed loan or side note that is deemed not collectible?
Load the loan in the Financed Loans screen. Click the arrow on line 9 to open the Loan Status popup.
Click the "Pay Off / Inactivate" button.You will be warned that this action is irreversible. Click "Yes" to proceed.
Enter the inactivate date and select a reason from the dropdown. Then click "Save". You will be asked if the deal is being re-financed, and then asked to put in a ledger date. Once done, you can close the popup.
Next, go to Bookkeeping > Adjustments and load the same customer. To write off the pay off amount, select "Write Off" on line 1 and adjustment account 6270 (Bad Debts) on line 4. Add a memo on line 7. Select all invoices to be written off in the invoice list and click "Save".
How to I post a payment to a different account/PID than the one on which it was originally processed? (Accounting Locked)
Please Note: In the case of an e-payment, these instructions should only be used if the payment was processed on the correct credit card or checking account, but posted incorrectly. (Ex. A customer with two loans makes a payment, and you post the payment to the wrong loan.)
In the case of a recent payment that was posted to the wrong account, you can void the payment and re-post it to the correct account. If it was an e-payment, you will need to re-post it manually. However, if the mistake is caught at a later date after the accounting period has been locked, you have two options.
Option 1: Unlock the accounting temporarily to correct the transaction. In the case of a financed loan payment, this is the best option, although it may change your financials slightly.
Option 2: Debit the account where the payment was incorrectly applied, and credit the account where it should have been applied, without unlocking accounting. In the case of a financed loan payment, note that this will create a slight interest distribution discrepancy between the two accounts.
To do this, go to Bookkeeping > POs/Invoices. Choose "customer" as the account type and load the customer to whom the payment was originally applied. Use the blue arrow to generate an invoice number, and enter an invoice date as close to the actual payment date as possible. On line 1, enter the amount of the payment that was incorrectly applied. Add a description on line 2 that indicates why you are debiting one customer and crediting another; we recommend using the payment transaction number or e-payment reference number and including the PID on both customer accounts. Leave both the receivable account and offset account as 11050. On line 5, choose to offset to a customer, and then choose the customer to whom the payment should have been applied. Click "Add Line" and then click "Save".
Note: In this example we are assuming a customer has two separate accounts under the same name, and a payment was applied to the wrong account.
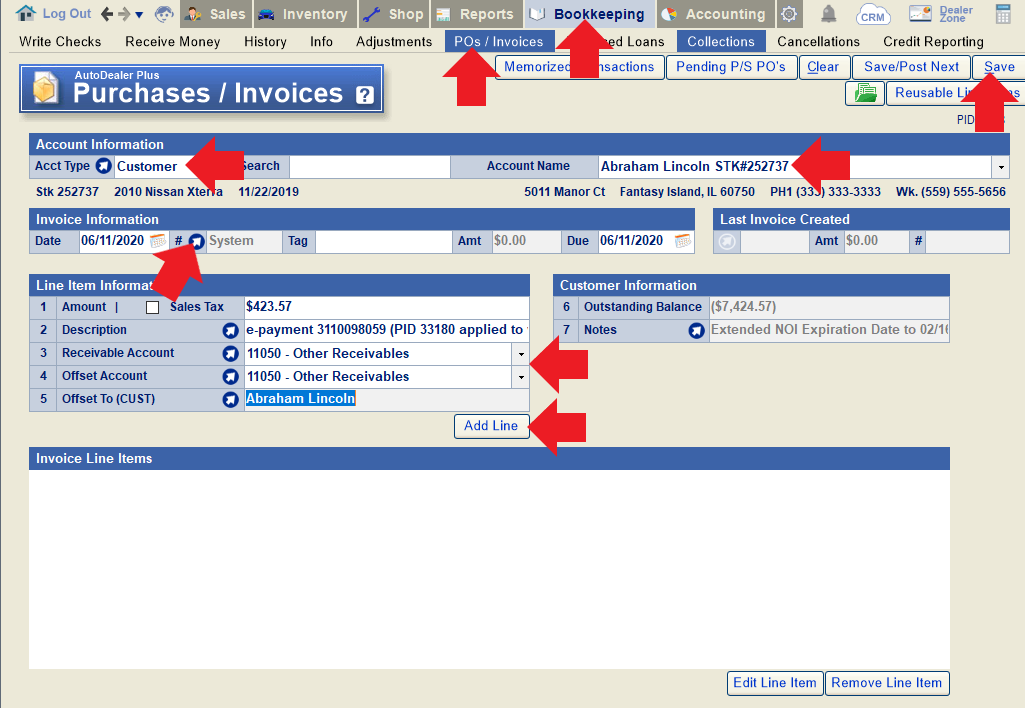
You will then have a receivable issued to the original customer for the amount that was incorrectly applied to their account, and a payable to the second customer to offset towards what was intended to be paid. To apply the credit, go to the Receive Money screen or Financed Loans screen (as applicable), load the second customer, and post a payment applied toward both the credit amount and an outstanding invoice, using "internal credit" as the payment method. Note that the credit amount should match the amount being applied to the outstanding invoices(s), so that the total nets out to "0". If the invoice amount is greater than the credit amount, you will need to do a partial payment on the invoice before applying the credit
Note: When posting this payment, it's best to use a date as close to when the money was originally received as possible.
I received an e-payment from a customer on the wrong account/loan. How can I fix it without refunding the e-payment?
Please note: These steps should ONLY be used if the payment was processed on the correct credit card or checking account. Otherwise, you will need to void the payment, refund the e-payment entirely, and start from scratch. If the payment was received prior to the accounting lock date, refer to this FAQ.
In some instances, you may have a repeat customer attached to more than one sale/loan in your system. Although there is only one customer, they are assigned a unique PID for each deal/loan. In the event that you receive a payment under the wrong PID, here is how you can post the payment to the correct PID in your system.
First, void the original payment in the History screen.
Go to Bookkeeping > History. Load the account on which you received the money. Highlight the payment that was received and click "Edit Transaction".
Click the "Void" button on the top-right of the popup. Confirm that you want to void the transaction, indicate the reason when prompted, and then click "Save".
You will be notified that the e-payment still exists; you have simply voided the transaction that was posted in the system, without voiding or refunding the actual payment.
Next, manually post the payment to the correct account.
Since the e-payment is attached to the incorrect PID, you will not be able to process it from the Pending Payments window.
Instead, go to Bookkeeping > Receive Money (or Bookkeeping > Financed Loans, for a financed loan account) and receive the same amount of money using "debit/credit card" or "other deposit" as the deposit type. Add a memo to indicate that the money was received as an e-payment under a different PID. Select the invoice to which the payment should have been applied, and click "Save".
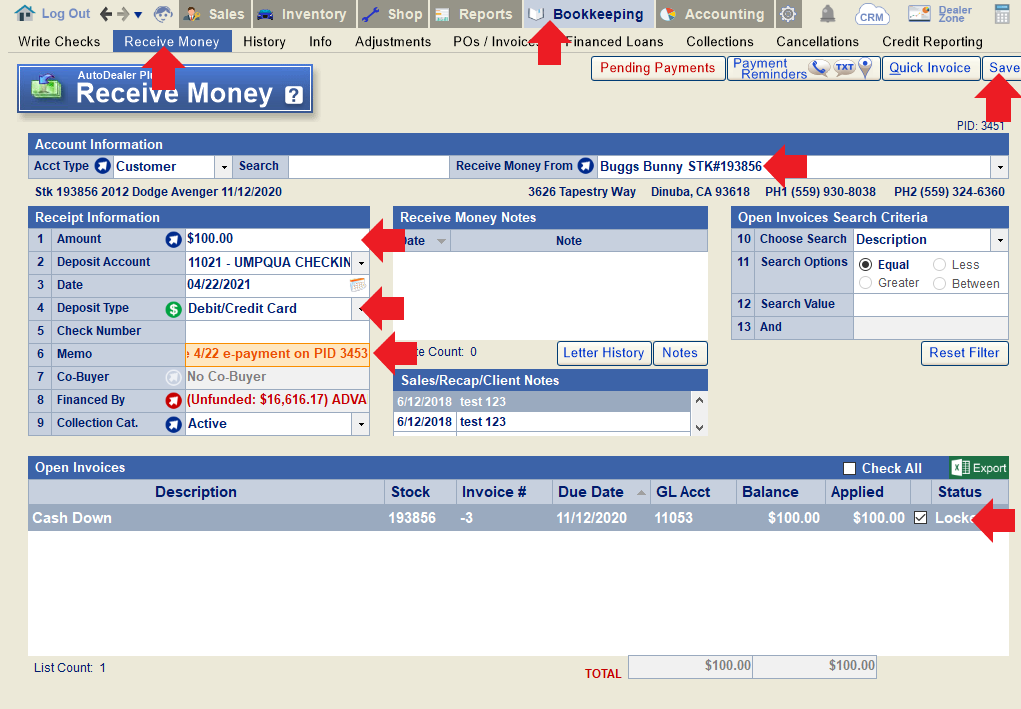
Finally, ignore the original e-payment in Pending Payments.
Open the Pending Payments window (from the Receive Money or Financed Loans screen), locate the e-payment that was originally received, and click "Ignore Payment". Because the payment was manually posted to the correct account in the prior step, we do not need to post it via pending payments (and doing so would double-post it). You will need to re-confirm that you want to ignore the payment and provide a reason (e.g. manually posted to correct PID XXX) to proceed.
When batching deposits, the manually-posted payment can be combined with the e-payment batch that includes the original (voided) payment.
If changes are made to a financed loan or BHPH customer's account, how long does it take for these changes to be reflected in the online payment center?
What happens when a recurring payment (credit card or ACH) is declined or comes back as NSF?
When a recurring credit card payment is declined, you'll be notified in the Pending Payments window, under the "List of Recurring Payments that were DECLINED" section.
A full list of the customer's declined payments will also show in the "History" tab of the E-Payment window for the customer in question.
In most cases, the recurring setup will remain in place unless manually deactivated. In the case of dealers processing through TGate, the recurring payments will stop automatically.
When a recurring ACH payment gets charged back, the payment will post, but you'll also see an NSF in the "ACH Payments that are NSF" section of the Pending Payments window. You can highlight the chargeback and click "Process NSF" to post the NSF along with an (optional) NSF fee.
Just like credit card declines, NSFs will also show in the "History" tab of the E-Payment window for the associated customer.
The recurring ACH will continue running on schedule unless deactivated manually.
What is an IRS Form 8300 and how do I print one?
Per IRS rules, any person in a trade or business who receives more than $10,000 in cash in a single transaction or related transactions must complete a Form 8300. Accordingly, when you have reached this threshold for cash received by a single customer in the course of a year, the system will automatically prompt you to print a Form 8300. If you need to print the form at a later time, go to the History screen, load the customer in question, and click the "IRS 8300" button at the bottom of the screen.
From the popup, you can select any relevant transactions and preview/print the form.
In the case of a Financed Loan customer, you'll see a red note in the Financed Loan notes to alert you when a Form 8300 needs to be filed.
Where can I find the per diem interest on a financed loan?