F.A.Q.'s and How-To's
How can I add a discount to a Repair Order?
To add a discount to a repair order, you can use the "Fees" option to create and apply a negative "fee".
To do this, load the RO in question and click "Fees" at the top of the screen. Then click "Create New Fee".
On line 2, type "Discount" for the description, or give the discount a more specific name depending on its use (e.g. "Detail Promo - $10 Discount").
On line 3, choose "Flat Price" (a discount can only be added as a flat dollar amount).
On line 5, add the discount as a negative amount (ex. -$10.00).
On line 8, choose the shop lot that will be using this discount (if applicable, for dealers with multiple shops).
On line 11, click the blue arrow to select a revenue account for the discount. Use the same revenue account as the item being discounted in order to offset the income.
Click "Save". Then click "Close".
To add the discount to the Repair Order, click "Fees" at the bottom of the screen. Locate the discount you added, highlight, and click "Select".
This will open the "Edit Fee Charged" popup to confirm the details of the discount. Click "Save" to apply the discount to the RO.
You'll now see that the discount has been added to the RO and the Grand Total has been reduced by the amount of the discount. Click "Save" at the top to save your changes.
How can I add resale certificate information to a wholesale vendor in Shop?
In Shop > Repair Orders, load a wholesale repair order for the vendor whose resale certificate information you wish to add.
Click the arrow on line 2 to open the Choose Vendor window. Add the vendor's resale certificate number on line 11 of the popup window.
To upload a copy of the vendor's resale certificate, click the green folder icon. In the Document Management popup, choose "Vendor" as the PID Type on line 1, select an appropriate folder on line 3, and add a document title on line 4. Then, scan the file, or choose it from your files on your computer if you've already scanned it. Click the Upload button to upload the certificate to the vendor's file in the Document Management system.
Tip: You can click the arrow icon on line 3 to add a folder named "Resale Certificate".
Note: The ASN Document Management system is free for your first 50MB of storage. Once you exceed the storage limit, you will need to purchase a Document Management subscription from the DealerZone to continue using this feature.
Be sure to save the certificate # in the Choose Vendor popup before closing.
How can I adjust our default labor rates in Shop?
Go to Settings (gear icon) > Defaults > Shop Defaults. Click the "Labor Rate Adj." button on the bottom-right corner.
Type in the labor rate you wish to change. For example, if you have 10 different types of labor set to a labor rate of $75/hour, and you wish to change these to a rate of $85/hour, you should type in "75" here.
Next, type in the new labor rate. Using the above example, we would type in "85".
Once you return to the Repair Orders screen, you'll see that labor lines that were previously set to the old rate ($75) have been updated to the new rate ($85). All other labor rates are unaffected.
How can I change the default tax rate for our service shop?
How can I change the receivable account used for a service contract vendor in the shop section?
How can I choose whether labor is taxed by default in our service shop?
How can I choose whether warranty parts are taxed by default in our service shop?
How can I create a restocking fee for a part on a repair order?
To create a restocking fee, open the Repair Order screen and click "Fees". Then click "Create New Fee".
Enter a name for the fee on line 2, choose "Restocking Fee Percentage" on line 3, and enter the desired percentage on line 4. Check the remaining fields to make sure they look correct, and then click "save".
To add the fee to an RO, click the 'Fees" button at the bottom of the RO screen. Search for the restocking fee you created. Highlight in the list and click "select".
If necessary, you can make changes to the fee in the following popup. Click "save" to save the restocking fee to the repair order.
You will see the fee has been added to the repair order, appropriately reflecting a percentage of the sales price of any returned parts.
How can I delete a Repair Order?
How can I hide all prices on a Repair Order printout?
How can I hide labor hours on a Repair Order printout?
How can I issue a cash refund to a customer in shop?
Load the RO in question and click the "Receive Money" button. Note: RO must be invoiced.
Click the "Write Check" button on the top-right. Note: You will only see this button if you have the proper security access.
Select the invoice(s) with a balance owed to the customer which you intend to pay. Then, click the blue arrow on line 5 to load the selected dollar amount.
On line 1, select account "1101-Petty Cash Fund". The system should automatically change line 2 to "Cash Dispersal". If desired, enter a memo on line 10.
Finally, click "Save Check".
How can I mark certain line items as customer pay vs warranty pay on an RO?
First, make sure a VSC company is entered on line 25 of the RO. The system should automatically prompt you to choose which jobs to assign to VSC/Warranty Pay. The corresponding dollar amount will automatically be entered into line 26.
To change the payer for a specific line item, right-click on the item and select "Edit Line". On line 10 (Pay Split), select whether the customer or VSC/Warranty will pay for that line item. You can also use the blue arrow to manage a pay split between the customer and VSC/warranty for the line item. Note: The system will ask if you want to reset the pricing when a switch is made. Pricing can change based on the RO Discount, the VSC/Warranty company's shop defaults, and standard warranty shop defaults.
The VSC/warranty amount on line 26 will automatically update when changes are made. To generate a printout of the RO with warranty-covered prices hidden, click on the "View RO" button and select "Hide Prices (Warranty)".
How can I print a Repair Order without prices shown?
How can I track tech time worked on individual labor lines in a repair order?
The ASN CRM can be used to accurately track tech hours spent working on repair orders. Dispatched ROs can be synced to the CRM for techs to clock in and out of individual labor items. This information is then synced back into the RO screen on your DMS, and recorded as the tech's "actual hours" spent on the labor line.
To start using this feature, you must first turn it on. Go to Settings > Defaults > Shop Defaults, and change line 32 (Sync with CRM App) to "Yes".
When an RO with one or more labor lines is saved to dispatched, the RO will then sync with the CRM, and the tech(s) assigned to each labor item will get a CRM notification.
When the tech views their CRM, they'll see a "Tech To-Do" button, with a red circle indicating the number of dispatched ROs currently assigned to them.
Clicking on this button will show all of their assigned ROs. They can then choose the RO they wish to "clock in" on, to begin working.
The tech will see all of the details of the RO, including the vehicle being worked on, mileage, RO type, and associated line items. They can then click "Start" on any line item assigned to them in order to start tracking time.
The system will automatically begin clocking the tech's time spent working on the selected labor line. The tech can pause the count if needed, or click "finish" once the labor has been completed. A tech may only be clocked into one labor item at a time.
Once the tech marks the labor item as "finished", it will be automatically be tagged as "completed". If there are no remaining labor lines assigned to the tech on that RO, the RO will be removed from the tech's list of assigned ROs.
The next time the RO is loaded in the DMS, the labor line will automatically be marked as "Work Completed", and the tech's actual hours worked will be auto-filled from the CRM data.
You may also view or print a log of all tech hours spent on an RO, including clock-in/clock-out times, by clicking the "Tech Printout" button at the top of the RO screen and selecting "Tech Hours - View" or "Tech-Hours - Print".
How can I utilize CRM to facilitate clocking in and out of ROs for my technicians?
How can I view profit in real time while creating a repair order?
To view profit in real-time as you're creating a repair order, follow these steps:
1- Navigate to the "Shop" tab on the software.
2- Select the repair order you're currently working on.
3- Hover your mouse over the "SM" section within the repair order, as seen in this image.
Q: What information will I see when I hover over the "SM" section?
A: When you hover over the "SM" section, you'll see essential profit details displayed in real time. For example, you might see a markup profit percentage, such as 92%, in the provided example. Also, you'll find detailed information about part profit percentage and net amounts. This information gives you a comprehensive view of the profit associated with the repair order you're creating.
Q: Will this information apply to both parts and labor?
A: The same information will be displayed for parts and labor. If your software records technician wages, you'll also see the profit details associated with labor costs.
How can we require "mileage out" to be input on all invoiced repair orders?
How do customers get repair status updates and pay online?
To enable this feature, your shop must have:
- Shop technicians using CRM to log labor and tasks.
- ASN ePayment processing set up.
- An active ASN text plan.
Steps to Enable Customer Repair Tracking & Payments:
- Enable Text Updates: Check the box ‘Text RO Updated to Customer’ (RO must be in dispatch mode).
- Customer Notification: Once enabled, the customer receives a text or email with a link to track their repair order (RO) progress.
- Customer Portal Includes:
- Estimate PDF: View repair order details.
- Vehicle Inspection: If MPI is completed, customers can see the inspection list.
- Video Walkaround: If recorded, customers can view it.
- Deposit Payment Option: Customers can make a deposit.
- Invoice PDF: Customers can view their invoice and payment status.
- Ready For Pickup: Customer notification if vehicle is ready for pickup.
- Payment Processing:
- Customers can enter their card details and complete the payment.
- If a partial or full payment has already been made, they can view ‘Payment History’.
- Payment Confirmation:
- Upon successful payment, customers see a confirmation message with transaction details.
- Email Receipt:
- An email receipt is sent automatically.
- Ongoing Access:
- Customers can return to the link anytime to review their repair progress or payment history.
- New ROs generate new tracking links.
This ensures seamless communication and transparency for your customers throughout the repair process.

You can easily track Customer RO updates by clicking on the green checkmark icon. Plus, a new text notification will now be sent automatically whenever a video walkaround is uploaded AND when a MPI has been completed, keeping you and your customers informed in real time.
How do I add a Hat # to my Repair Orders (ROs)?
Click on the marked area in the Service Information label, just below the RO#.
-
Enter the Hat # in the pop-up screen that appears, then click OK to save it to the screen.
-
Be sure to save the RO itself to ensure the Hat # is permanently recorded.

How do I add a warranty/VSC to an RO?
Click on the blue arrow on line 25 to select the VSC/Warranty company.
If your system defaults do not require an exact match between VSC/warranty-pay line items and the claim amount entered, you will be able to enter the VSC claim amount (manually) on line 26.
If your system defaults require an exact match between VSC/warranty-pay line items and the claim amount entered, the system will automatically calculate the claim amount for you based on the following:
If the RO only has one job line, the system will prompt you to assign all line items to the Warranty/VSC. If you select "yes" all line items will be marked as warranty pay. If you select "no", you will then need to mark individual line items as warranty pay. The system will also prompt you to reset prices for Warranty/VSC. This will adjust prices and tax based on your shop defaults for warranty work as well as the specific warranty company's pricing defaults, as applicable.
If there is more than one job on the RO, the system will ask you to select which job(s) to assign to the Warranty/VSC. You will also see a checkbox to reset pricing.
The system will then automatically calculate the warranty/VSC amount on line 26, based on the line items/jobs that were applied to the warranty/VSC.
Up to three warranties/VSCs can be added to an RO from within the RO VSC/Warranties window, accessible from the blue arrow on line 25. This popup can also be used to remove a warranty/VSC from an RO, or to choose which jobs are assigned to the warranty/VSC.
How do I add or change my logo for the R/O Printout?
Open the DealerZone and go to Other > Service Shop Logo.
Per the instructions, make sure the logo you plan to use is a JPEG image with dimensions 326w x 192h and resolution of 96 dpi. You should have a separate logo for each shop you have, with the name and address of the shop included in the logo.
When your logo(s) are ready, choose the shop location you want to upload a logo for, and click "choose file" to locate the file on your computer. Then click "Upload Now".
Finally, return to the RO screen. Make sure the lot on the RO you have loaded matches the location you selected when uploading your logo. Then, right click on the "View RO" button and choose any option to force the logo to be downloaded to your computer. Note: You must repeat this final step on every computer that will be generating RO printouts.
How do I change the default tax rate used for my Service Shop?
How do I clear a repair order invoice against an employee's payroll check?
If an employee owes your service shop money for a repair order, you can deduct the money from their next payroll check by following these steps:
Step One: Issue the employee an advance for the amount owed.
Go to Bookkeeping > Write Checks. Load the employee's account and click "Quick Advance".
Enter the amount owed on the repair order, add a description for your reference, and enter a due date that is earlier than your next payroll date. Click "Save".
Step Two: Pay the advance out of the clearance account.
First, select "electronic payment" as the payment method on line 2. Then, select "11024-Clearance Account" on line 1. Add a memo if desired on line 6.
Make sure the advance is selected in the list of invoices below. Then click "Save".
Step Three: Receive the money on the RO.
In Shop > Repair Orders, load the RO for which the employee owes you money. Click the "Receive Money" button to receive a payment.
Select the correct invoice from the list and choose "ACH-EFT" as the deposit type. Enter a memo if desired on line 6 to indicate that the money will be deducted from the employee's payroll. Click "Save" to finish receiving the payment.
Step Four: Change the account on the RO payment to the clearance account.
Click on "Pmt History" in the RO. Right-click on the payment that you just received and click "Edit Transaction".
Change the check account on line 8 to "11024-Clearance Account". Then click "Save".
Note: The money paid to the employee via advance from the clearance account will wash with the money received on the RO and deposited into the clearance account.
Step Five: Deduct the advance from the employee's next payroll check:
The next time you enter payroll, open the Employee Deductions tab and right-click on the employee's name to open the "Advances" popup.
Select the advance to be paid back and click "Save".
The advance will then be deducted from the employee's payroll check.
How do I create a due bill on a sale that will show up in my shop tab?
To create a due bill on a sale, open the F&I tab and select "Add" under Due Bill Information.
Enter the due bill information on lines 1-7, or highlight a default item from the list and choose the "Select" button to auto-fill lines 1-7. Then click "Save".
Note: You can also create a shop appointment for the customer from within this popup.
Save the deal to finalize the changes made to the due bill.
Once the deal is tripped, any due bill item with an associated cost will show up in Shop > Work in Progress > Due Bill Report. From this window, you can also create a shop appointment for the customer, or start an RO for the due bill item(s).
Once the due bill item has been completed, go back to the F&I screen and edit the due bill item to mark it as completed. Re-save the sale to save your changes.
How do I create a Kit using a Flat Labor Rate?
If you want a kit that uses the Flat fixed labor charge method instead of hourly, here is how to accomplish it. In this method, hours don't affect the charge.
To create a Kit using a Flat Labor Rate, follow these steps:
Go to the Repair Order Tab, Click the 'Kit' button, and Create a new Kit. When adding labor, you will notice a new option for 'Flat Price'> Select the 'Flat Price' option. Enter the flat amount you plan to charge for the kit. Save the Kit.
When you have a Repair Order (RO) for which you wish to use the new kit, simply select it as you normally would when adding a kit. You will notice that the labor line is reverse-calculated to display the number of hours, and only a flat amount is charged for the customer to pay.
You can add as many kits as you wish, such as Flat Tire Fix for 1 Tire or 2 Tire.
How do I enable the PayPal Feature in Shop Module
The PayPal feature is only available in the Shop module when customers pay for their Retail ROs through the Customer Portal screen. It cannot be used with the “Send Customer PayRO link” option in the Receive Money screen.

To enable this feature, your admin must sign up with PayPal or link your company’s existing PayPal account. This setup must be completed in CRM Settings by an authorized staff member:
-
Go to CRM Settings > Other tab.
-
Locate the PayPal Settings button (bottom of the middle row).
-
Click Link Your PayPal Account with ASN Software to complete the connection.

Please let us know if you have any additional questions.
How do I issue a refund in shop?
To issue an e-payment refund, follow these instructions, or for a cash refund, follow the instructions here.
To issue a refund by check, follow the instructions below:
Load the RO and click the "Receive Money" button. Note: RO must be invoiced.
Click the "Write Check" button on the top-right. Note: You will only see this button if you have the proper security access.
Select the invoice(s) with a balance owed to the customer. Then, click the blue arrow on line 5 to load the selected dollar amount.
Choose the checking account you wish to use on line 1 and the payment method on line 2. If desired, enter a memo on line 10.
Finally, click "Save Check".
If "Computer Check" is selected, you will then need to go into Accounting > Check Register to print the check.
Filter by the checking account on line 1, "Computer" check type on line 6, and Printed > "No" on line 7. You can also filter by the customer name, amount, or date on lines 2-5, if necessary to locate the check.
Select the check in the list below and click "Print Selected Checks".
How do I print a receipt after receiving money/posting payments?
If money was received in the Bookkeeping section (Receive Money screen or Financed Loans screen):
Go to Bookkeeping > History. Load the account towards which the payment was posted. Select the correct transaction in the Checking History below and click "Print Receipt".
If money was received in the Shop section (RO Screen):
Go to Shop > Repair Orders. Load the RO towards which money was received. Click the "Pmt History" button below line 33.
Select the correct transaction in the Payment History window and click "Print Receipt".
Note: By default, the system prompts you to print a receipt any time you receive money. If you are not getting prompted, this means you previously disabled these messages. Read this FAQ to learn how to reset them.
How do I receive money from a warranty or service contract vendor on an RO?
How do I refund an e-payment?
In order to refund an e-payment back to the original payment method (card or checking account), you need to access the client's e-payment history. To do this, first open the e-payment window associated with the customer. You can do this from the Receive Money screen or Customer Deposit window for sales clients, or from the Receive Money window in the Repair Order screen for shop clients. Just click the dollar sign icon next to "Deposit Type" on any of these screens (-make sure you have the correct client loaded).
Navigate to the History tab and select the payment you wish to refund.
Click "Void/Refund Payment".
Enter the amount you'd like to refund, and click "Submit".
The system will attempt to void the payment first (typically applicable if the payment was taken on the same day it is being refunded). If it cannot be voided, it will be refunded. The next message will indicate whether a void or refunded occurred.
How do I set up a cost markup for parts in Shop?
Go to Settings (gear icon) > Defaults > Shop Defaults. Click the "Edit Cost Matrix" button below line 18.

The cost matrix allows you to specify multiple tiers of cost markups based on the cost of the part being sold.
To set up a new matrix, first choose the type of RO you wish to create a matrix for. Note that if you'd like to use a cost matrix on more than one type of RO (retail vs counter sale vs warranty/VSC), you will need to set each one up separately.)
Next, choose whether the matrix should override a part's list price in cases where a specific list price was specified when the part was set up (in the Manage Part Information window). There are three columns for this setting; each is associated with the RO type listed above it.
Finally, add matrix entries as desired. For each entry, enter the desired cost markup percentage, as well as the maximum price of parts that should be assigned this markup, and click "Save New Entry".
For example, in the below screenshot, parts with a cost between $0 and $100 will be assigned a 25% markup, parts with a cost between $100.01 and $250 will be assigned a 20% markup, and so on. This will be applied to parts being paid by a warranty or VSC.

Below is an example of how this cost matrix would take effect on an RO. Because the part is being paid by the VSC/warranty and the cost falls in the second tier of the price matrix, the markup assigned is 20%. This is calculated as follows: $125 (cost) x .2 (20% markup) = $25 markup. Therefore the list price of the RO is set to $150 ($125 cost + $25 markup).
Keep in mind that the cost matrix can be used in tandem with a default parts discount. For example, if you have a 20% price markdown set up for parts in your shop defaults, and you have the "Use RO Discount" box checked in the Edit Line Item popup, the 20% discount will be applied to the $150 list price, making the Sales Price of the part $120.
How do I set up a price markdown for parts in Shop?
Go to Settings (gear icon) > Defaults > Shop Defaults. Choose the type of RO you'd like to set a markdown for on the "Discounts" label above line 16. Then, set the desired price markdown percentage on line 10. Changes are saved automatically.

The new markdown will be used as the defaults parts discount on line 21 for all newly-created ROs.
Note that if a specific customer/vendor has a custom default discount set in the "Choose Customer/Vendor" window, this will override the system default for line 21.
Price markdowns can also be used in conjunction with cost markups. For more details on setting up a cost markup, see our Cost Matrix FAQ.
For a comprehensive guide, watch this video tutorial.
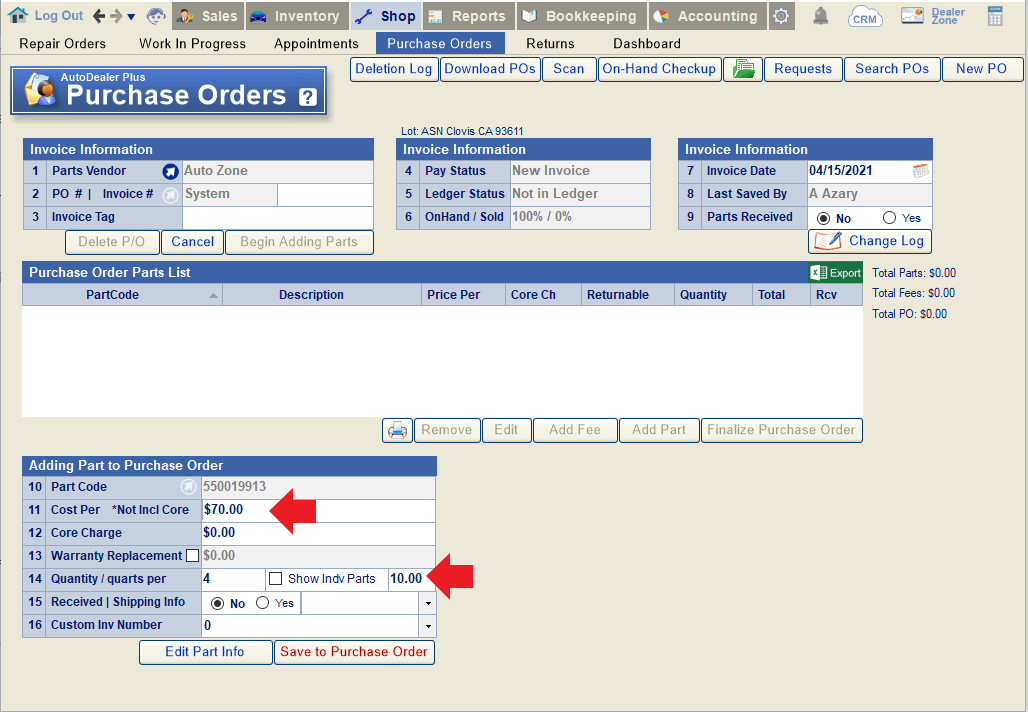
How do I stock and sell a part like grease, oil, or gas in partial units?
To add a part sold in partial units:
In the Manage Part Information popup, line 4 should be set to "Partial Units (gog)". On line 5, enter a description of the part on the left-hand side (e.g., "oil"), and the unit of measurement by which the part will be sold on the right-hand side (e.g., "quarts"). The retail price on line 7 should be the price at which you intend to sell a single unit (in this case, a single quart of oil).
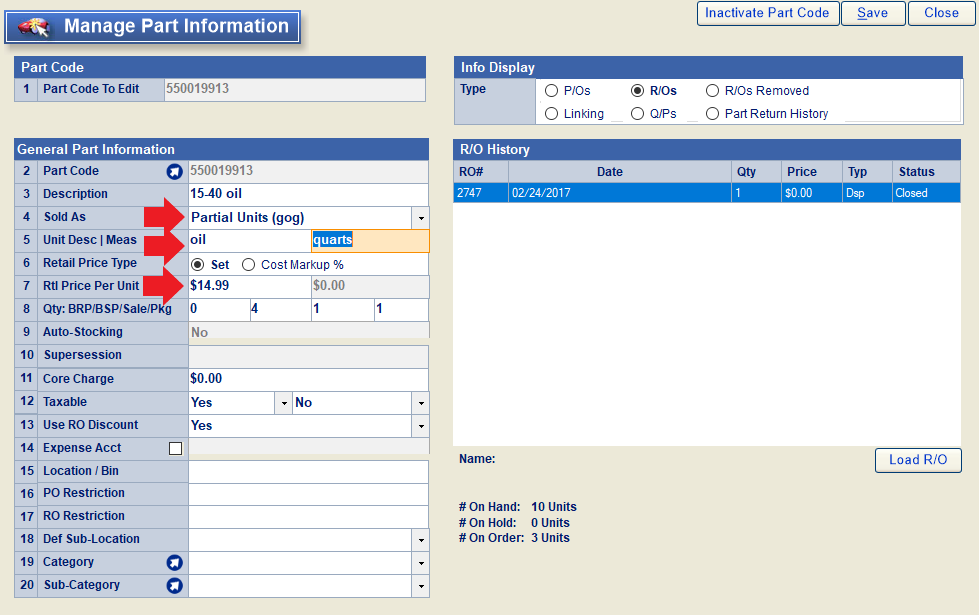
To stock in the part:
When the part is being added to a purchase order, enter the number of items you are purchasing in the left-hand section of line 14. For example, if you are purchasing 4 containers of oil, the quantity would be "4".
In the right-hand section, enter the number of units per part. Remember, the unit is based on how you intend to sell the part. For example, if you sell your oil in quarts, and one container holds 10 quarts, the units per part entered would be "10".
The cost entered on line 11 should be the cost per part. In this case, that would be the cost per container of oil.
The below example would indicate that we are purchasing 4 containers of oil, or 40 quarts total, at $70/container.
To sell one or more units of the part:
When the part is added to a repair order, you will see that each part contains multiple units. The number of units will be based on the number you entered in line 14 of the purchase order when stocking in the part. In this case, each container we purchased holds 10 quarts of oil, so each part has 10 units.
Enter the number of units you intend to sell on line 3. In this case, if we want to sell the customer 5 quarts of oil, we would enter "5" on this line.
Next, select one or more line items as needed to fulfill the quantity used in the RO. In this example, since one container holds 10 quarts of oil and we only need 5 quarts, we only need to select one line item to reserve for the RO.
Once you attempt to reserve the part, the system will ask you how many units you need for the RO. It should automatically insert the amount entered in line 3 above. Click "Ok" to reserve the specified amount.
In the example below, this indicates that we are reserving 5 quarts of oil from a 10 quart container.
Note: The intent behind stocking a part as partial units is that it allows you to sell the part in fractions of a unit as well as whole units. So, for example, if you needed 5 1/4 quarts of oil for an RO, you could enter the "quarts in sale" as 5.25, and reserve 5.25 quarts out of a 10 quart container.
How do I use the eSign feature to receive authorization from my customers for their repair order?
When viewing a repair order, click on the
eSign button (

. This will allow you to initiate the authorization process electronically. To see a step-by-step demonstration, watch the recorded walkthrough linked here:
eSign Step-by-Step Instructions
-
Open the customer’s Repair Order in your system.
-
Click the eSign button on the screen ().
-
Follow the on-screen prompts to select and send the document for signature.
-
Choose the customer’s preferred contact method (email or SMS).
-
Once sent, the customer will receive a link to review and sign the document.
-
After signing, the completed document will appear in the eSign Log for your records.
eSign Step-by-Step Instructions
How do I use the tag system for repair orders in the shop?
Tags in shop can be used to categorize ROs, or call attention to certain things when a repair order is loaded. For example, you might add a tag for "Loaner/Rental" on every RO that has a loaner vehicle attached.
To manage the list of tags available in the RO screen, click on the "Tags" button on the bottom-right-hand corner of the screen and choose "Tag Management".
From the Tag Management window, you can add to, edit, or delete from the list of available tags. When adding a tag, enter the name of the tag on line 1 (ex. Loaner/Rental). Add a color for the tag on line 3, and set a priority level for the tag on line 4 (0 being the highest possible priority). On line 4, you can also choose whether you want the tag to be turned into an alert every time an RO with that tag is loaded. Use the "save changes" button to finish adding or editing.
To apply a tag to an RO, click the "Tag" button, select "Add a Tag", and then choose the tag you'd like to add. It will then show up in the Tags section of the RO.
ROs can also be filtered by tag in the Work in Progress screen. Choose "Tag" as the filter on line 1 and then enter the tag name on line 3 to filter results.
How do I write off the balance on a repair order?
To write off the customer balance on an invoiced repair order:
Load the RO screen and click "Receive Money".
Click the "Write Off" button. Note: You must have the proper security to see this button.
Select the invoice(s) you wish to write off in the list below. Enter a date for the write-off on line 13, and add a memo if desired on line 14. Then click "Save Write-Off".
To write off a warranty claim balance on an invoiced repair order:
From the RO screen, click the blue arrow on line 25 to open the RO VSC/Warranties popup. Then click the "Receive $" button under the warranty in question, and follow the same steps above to enter a write-off.
What do the different colors mean for the parts?
The color code for RO items as as as follows:
Red = Part Is not in Stock/unavailable
Orange = Part is on order
Purple = Parts are partially available (ex. 5 needed but only 2 avail)
Green = Parts is in Stock/Available
Labor lines will be red if incomplete.
What is a parts disposal?
What is the difference between each RO status?
An RO can be in one of 6 different statuses at any given time: quote, estimate, dispatched, completed, invoiced, and closed. Typically, an RO will move through these statuses in sequential order, although in some cases, it may make sense to skip over one or more. (For example, there is usually no need to dispatch a counter sale.) The following explains what each status signifies, so you will know when and how it should be used.
Quote: This is the initial stage that should be used when quoting pricing on a repair order. At this stage, the RO may or may not ever be implemented. You cannot receive a deposit on an RO while it is in "quote" status.
Estimate: Once you know that you intend to implement an RO, you can move it into "estimate" status. At this point, the RO is not yet ready to be worked on (or not yet complete, in the case of a counter sale), but you can receive a deposit for the work.
Dispatched: When you are ready to start work on an RO, you can move it into "dispatched" status. If you are using the ASN CRM to log tech hours, this will also send the RO to the assigned tech(s) via the CRM so they can begin their work.
Completed: Once the work on an RO is done, the RO can be moved to "completed" status. It may not yet be invoiced.
Invoiced: Upon saving an RO as invoiced, it gets posted to accounting.
Closed: Finally, when there is nothing left to be done on the repair order, the RO can be marked "closed". Typically, this means all work has been done and all money has been received. Your shop should have specific guidelines that outline when an RO is to be closed. You may want to appoint one or more individuals to look over each RO for any mistakes, open receivables, or other missing items before closing it.
Where can I find tutorials for Epicor?
Why am I unable to save an RO?
If you're unable to save a Repair Order (RO), it could be due to the following reasons:
Locked Accounting Period: If the accounting period is locked, any invoiced ROs with a date prior to the closed period are locked and cannot be modified. Additionally, an RO may still be locked even if the accounting period is open. In this case, you'll need the appropriate security clearance to unlock the RO before making changes.
Security Restrictions: Certain security settings might restrict you from saving the RO based on specific conditions. If you're unsure about the criteria, consult your system administrator or contact ASN for further clarification on the security settings.
