F.A.Q.'s and How-To's
How can I add a contract cancellation option to a deal?
From the deal screen, click the arrow on line 5 to open the Fees popup. Make sure you have the Contract Cancellation fee checkmarked. Depending on how the fee is set up in your system defaults, you may be able to change the price as well. Click "Save" to save your changes.
Once the contract cancellation option has been added, you should see the associated contract available to print in the Contracts screen.
Note: The exact location of the contract on this screen will vary depending on how your Contract lists have been set up. If you don't see the Contract Cancellation Option at all, you may need to assign the contract to a button or your right-hand list.
How can I adjust the printing alignment of the DMV 262 for off-the-street purchases? (CA Dealers)
How can I assign contracts to a print button or change the contracts in the right-hand list?
On the Contracts screen, right-click on the contract button for which you want to assign contracts (or any button to change the right-hand list). Click "Edit Contracts".
Check or uncheck boxes in each category as needed to add/remove contracts from the button or right-hand list. Click "Close" when done.
How can I change the location of a sale? I have more than one lot and my sales contracts are printing with the wrong lot info.
How can I create or modify a custom Buyers' Guide?
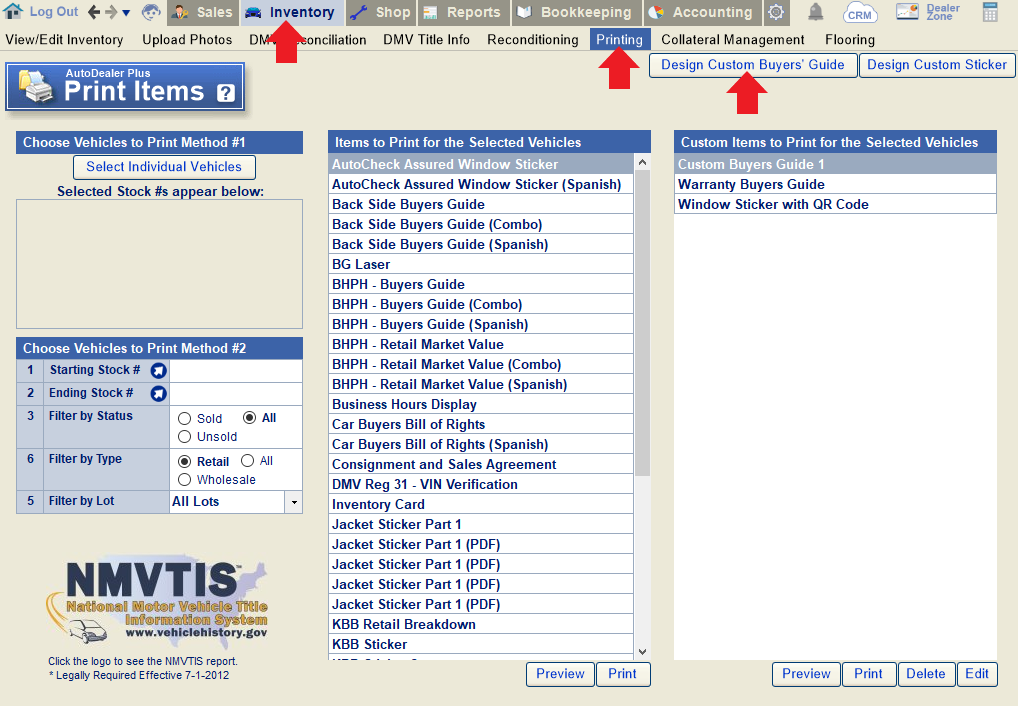
Go to Inventory > Printing.
To design a new custom Buyers' Guide:
Click "Design Custom Buyers' Guide".
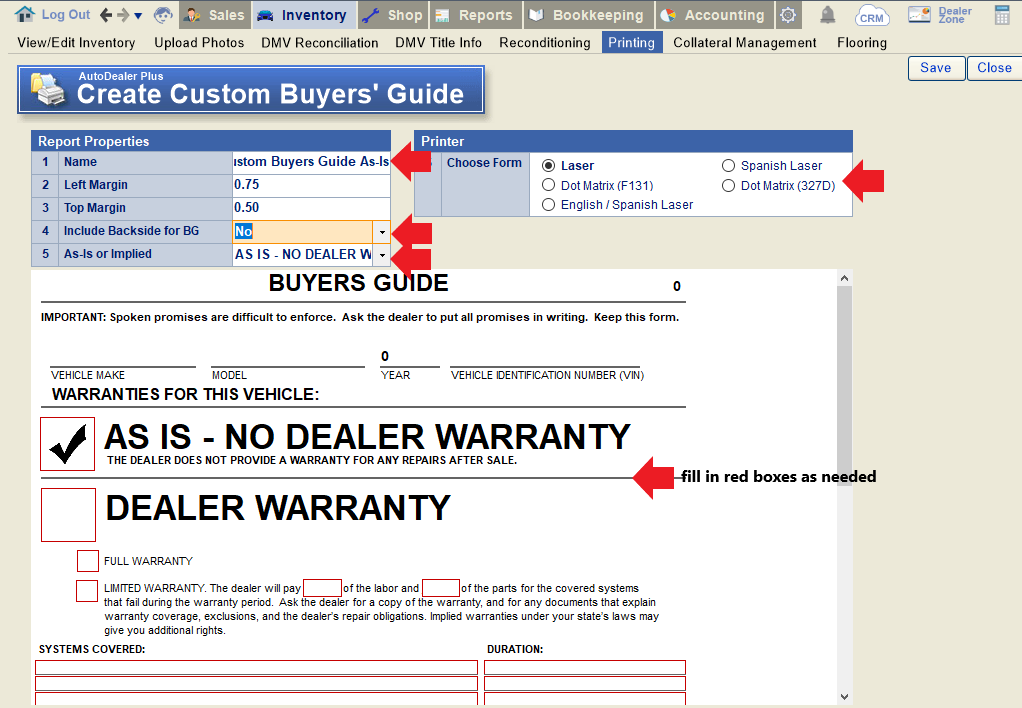
Enter a name for the custom Buyers' Guide on line 1. On line 4, choose whether or not you want to include the backside as well (for duplex printers). On line 5, you can select between an "as is" or "implied warranties" statement for the buyers' guide. (Note that the preview on this screen will show "As-Is" no matter which option is selected.) Under the printer section, choose whether you will be printing on a laser or dot-matrix printer. There are also options to create a Spanish Buyers' Guide, or an English/Spanish combo.
In the Buyers' Guide preview, double click in the boxes next to "As Is" or "Dealer Warranty" to check the appropriate box. ("As Is" will read as "Implied Warranties" when the form is printed if that option was selected above.) If checking "Dealer Warranty", use the red boxes to choose between full or limited warranty, and to add other details including systems covered and duration.
Scroll down to the bottom half of the preview to add any custom disclosures that you'd like to include for all vehicles when printing this form. Check the "Manufacturer's Warranty Still Applies" box to allow the system to automatically determine when a vehicle is still covered under the manufacturer's warranty. (While we do our best to collect accurate information, note that it is your repsonsibility to ensure this information is accurate before printing any Buyers' Guide.) If you offer a service contract customers can purchase, check the "Service Contract" box. Click the "Save" button to finish creating the new Buyers' Guide.
To edit an existing custom Buyers' Guide:
Select the Buyers' Guide you'd like to edit in the "Custom Items" list and click "Edit". Be sure to save your changes when done.
How can I edit a field in a contract before printing it?
If the contract is a laser contract:
Highlight the contract in your contracts list and click "Preview".
Click "Pop Out". This will open the contract as an editable PDF. Once you've made any desired changes, you can print the PDF or save it to your computer.
Note: Certain contracts are not editable.
If the contract is an Okidata (dot-matrix) contract:
Highlight the contract in your contract list and click "Edit".
Type in the editable fields, or select a field and use the "eye" icon to hide that field. Hidden fields can be saved by using the "Save for THIS computer" button (your computer only) or the "Save Globally" button (all computers). However, if you edit the text within a field, you will need to print the contract immediately, as you cannot save these changes.
Note: Certain contracts are not editable. Additionally, hidden fields will still show in the contract Preview, but they will not print.
How can I print a credit application for a customer to sign?
On the Buyer Information screen, make sure as much information as possible is filled out, including all required fields (marked with an asterisk (*)). Depending on your DMS Settings, the Email field (line 11) may also be required. Then click "Run Credit".
Select "ASN Credit App" (or the Alternate Format) from the Credit Application Forms on the left. From here you can Print, Preview, or Email the application.
Alternatively, on any saved deal (pending, tripped, or final), you can also go to the Contracts screen and print the Credit App from there. If you do not see this contract in your list, you may need to add it to a contract button first.
How can I print contracts in Spanish?
How can I set up RouteOne to sign me in automatically when I submit deals?
Once your RouteOne ID is integrated with your DMS, clicking on the RouteOne submission button will take you to the instructions to enable automatic single sign-on (SSO). From this screen, you have the option to go directly to the RouteOne website and sign in manually, but we recommend that you set up your SSO in order to skip this step when submitting.
To begin, right-click on the RouteOne logo to open it in a new tab. You will need both tabs to complete this process.
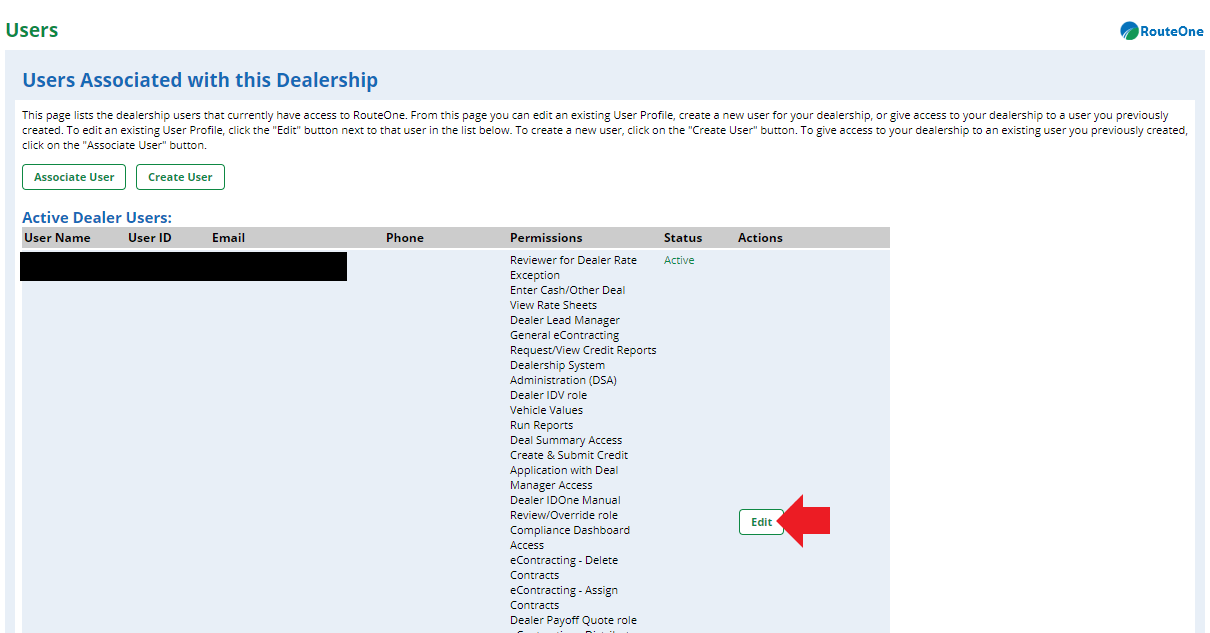
Once you’ve logged into the RouteOne website, click “Admin” on the top-right and then select “Users”. (You will need to be an Admin on the RouteOne site in order to access this.)
Find your name (or the name of the employee whose automatic sign-on you are trying to set up) in the list of users and select “Edit”.
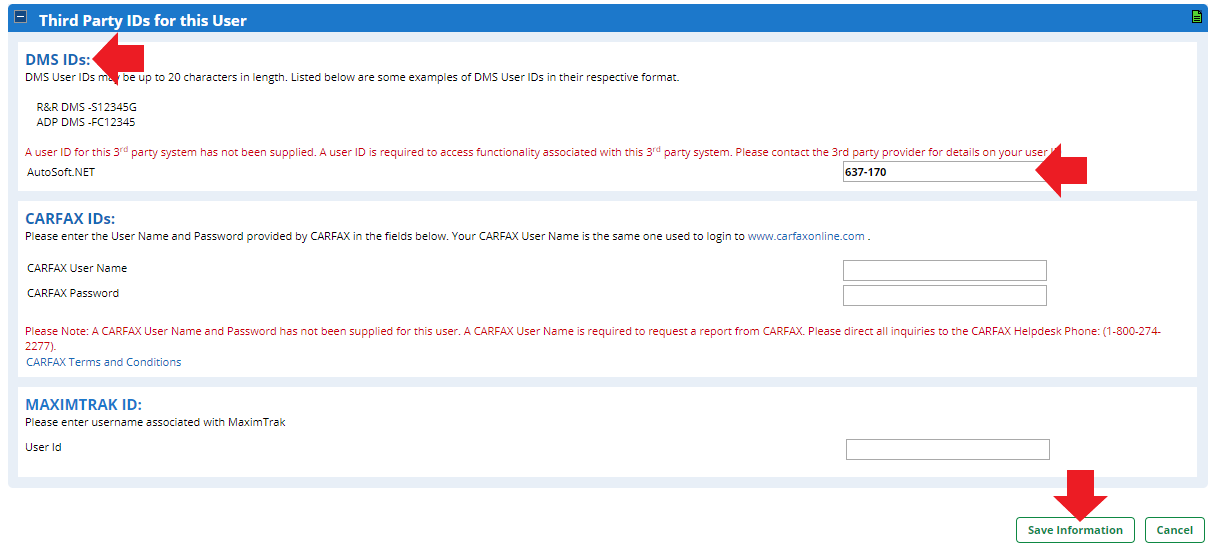
Scroll down to the section labeled “Third Party IDs for this User” and locate the sub-section for “DMS IDs”. Return to the first tab you opened and copy the ID listed in the red box on step 3. Paste this ID in the blank field for “DMS ID” on the RouteOne website and click "Save Information" at the bottom of the screen. You MUST use the ID generated on your computer when the user you are trying to set up is logged into the DMS. Do NOT use the ID in the below screenshots; it will not work.
PLEASE NOTE: Every user has a unique ID that must be inputted into the “DMS ID” field in RouteOne. A user must be logged into the DMS before clicking on the RouteOne button in order to get their unique ID. That ID must match the DMS ID inputted in RouteOne for their personal username. Users cannot share IDs or log into another person’s RouteOne account automatically from their login in the DMS.

The next time you click the RouteOne button in your DMS, you will be asked to follow a few simple steps to finish registering your computer. Once the process is complete, clicking on the RouteOne button in your DMS will log you directly into RouteOne and open the submitted deal automatically.
How can we add a new form/contract to the list of documents available to print from the Contracts screen?
First, check to make sure that the contract isn't already available in the Contract Management popup. See this FAQ for instructions on how to view all available contracts and manage your Contract lists.
If the contract does not already exist in your DMS, you can use the Form Making feature by clicking here. This will allow you to program any form you wish to print at the time of sale. Utilizing this feature can help you avoid paying ASN custom form fees. However, please exercise caution and refrain from using this for Retail Sales Contracts, as it may result in incorrect calculations.
Alternatively, ASN can program any form for you for a one-time charge of $495 per form. The exception to this is state DMV forms, which do not incur a charge to program.
To request custom contract programming for a laser contract (prints on blank paper with a laser printer), please send in a TSM authorizing the charge, and attach an original (unfilled) PDF of the form that needs to be programmed. Scans/copies/pre-filled forms cannot be accepted.
To request custom programming for a dot-matrix contract (print on a carbon copy contract using an Okidata printer, please mail a check and 3 blank contracts to our office:
ASN Software
555 Herndon Ave
Clovis, CA 93612
How can we change the verbiage regarding the Doc Fee on our purchase orders?
How do I fill out the contact information for complaints on the back side of the Buyer's Guide?
Go to Settings (gear icon) > Defaults > Miscellaneous Defaults.
On line 9, enter the information that you'd like to appear on the "Complaints" line (ex. John Doe - General Manager).
On line 10, enter the email address you'd like printed on the "Email" line.
All changes are saved automatically and will take effect immediately.
How do I pull a NMVTIS report for a vehicle?
A NMVTIS report can be pulled from multiple screens in the software including:
Sales > Book Values - Use this screen to pull the NMVTIS report for any vehicle, regardless of whether it exists in your inventory. Click the NVMTIS button at the top of the screen.
Sales > Vehicle Info - While working a deal, you can use this screen to pull the report for the sale vehicle. Click the NVMTIS logo on the right side of the screen.
Sales > Contracts - Use this screen while printing sales contracts to print the NMVTIS report for the sale vehicle. Click the NVMTIS logo on the bottom-right corner of the screen.
Inventory > Printing - Use this screen to print a NMVTIS report for any vehicle in your inventory. Click the NVMTIS logo on the bottom-left corner of the screen.
NOTE: You must first sign up for a VINAudit account in order to pull NMVTIS reports. To do so, just click on any of the above mentioned NMVTIS buttons to be directed to the signup form. If you already have an account, there will be link on the signup form to log into your existing account.
How do I re-order the contracts in my contract list?
On the Contracts screen, right-click on the contract button for the list you want to re-order and click "Manage Print Ordering".
Drag and drop the contracts in the list until they are ordered as desired. Then click "Done".
Tip: If you are printing any Okidata (dot-matrix) contracts (signified by a "D" in the list), we suggest keeping all of these together at either the top or bottom of your list so that when it comes time to print, you can feed all of the paper contracts into your printer at once.
How do I set up my Okidata / dot-matrix printer?
We have created two videos to walk you through the process of setting up a new Okidata / dot-matrix printer.
The first video shows you the basic printer setup (unboxing and plugging it in). Watch it here.
The second video demonstrates how to adjust the software and internal settings within the printer. Watch it here.
How do you add a third-party report or document to the eSign Package?
How to Convert eSigned Documents into an Approved Printed Version for Lender Submission?
Important Instructions for Providing the Lender with an Approved Original Contract
You have the option to provide the lender with an approved original copy of the contract from the eSign package. Please carefully review the following details, as this is a non-reversible process:
Eligibility for Conversion and Printing:
If your account includes the required security permission, you will be able to convert and print the contract directly from the eSigned version. This ensures the lender receives the original, converted copy with the unique digital markings intact. Note that no additional copies with the same digital markings can be reproduced.
Required Security Permission - #903 Transfer Authoritative E-Signed Files:
- This security setting allows authorized employees to "transfer out" the authoritative copy of any eSigned contract.
- This action generates a digital, printable PDF that includes a red "Authoritative Document" watermark.
- Important: This process is irreversible. Once completed, the official version of the contract is transferred out of ASN, making your dealership the new custodian of the document(s).
- Note-If you edit Security #903: Transfer Authoritative E-Signed Files, please allow until the next day for the DocManagement website to sync with the updated security settings.
Please proceed with caution and ensure all details are reviewed before completing this process. If you have any questions or need assistance, feel free to contact our support team.
Steps to Convert eSign Sales Documents to Approved Printed Version
How to Use RouteOne eSign Interface?
I have a deal that is not submitting to CUDL/RouteOne properly. It says it submitted but I can't find it online. What do I do?
If you have submitted a deal to RouteOne or CUDL and don’t see it appearing on the RouteOne/CUDL website, check for any special characters (commas, apostrophes, accent marks, etc.) in the buyer/co-buyer information. Please be sure to check ALL info: names, previous and current addresses, previous and current employer's info, etc. for both the buyer and co-buyer. Any special characters in this information will prevent the deal from submitting properly. Remove the special characters, re-save the deal, and re-submit to fix this issue.
If the above solution does not work, and you have more than one dealership lot, it may be that you are submitting the deal from the wrong lot. The address selected on line 3 of the Contracts screen must match the address pertaining to the RouteOne/CUDL account you are trying to submit to. If it does not, follow these steps to change the location of the sale.
For CUDL, you can see the Dealer name and ID on the top-left corner of the CUDL Dealer Portal. It's also easy to confirm which CUDL ID is assigned to each lot in the DMS by going to the DealerZone. From the DZ, click Other > Store and scroll down to the box that says "CU Direct". Click on this box.
Make sure the ID number listed at the top of your CUDL Dealer Portal matches the number assigned to the lot you are trying to submit the deal for.
RouteOne also lists the dealership name and RouteOne ID on the top-left corner of the brower page. Contact our office if you think the ID is assigned to the wrong lot in the DMS.
I'm a California Dealer and trying to set up Fairfax to submit Reports of Sale electronically, but it's asking for a salesperson's license number. Where do I enter this?
I'm a California Dealer and trying to set up Fairfax to submit Reports of Sale electronically, but it's asking for a salesperson's license number. I'm an owner and do not have one.
I'm getting an error regarding the service contract or GAP on a deal. How do I fix this?
For Service Contract Errors:
Open the Service Contract popup on the deal screen.
Click "Reset Plans". Once they've been reset, make sure the service contract selected is still correct and then click "Save/Close".
Finally, re-save the deal. Any service contract errors you may have been encountering should be resolved.
For GAP Errors:
Open the GAP popup on the deal screen.
Click "Reset GAP Plans". Once the system is finished getting new rates, choose the correct GAP again and click "Select". Finally, re-save the deal. Any GAP errors you may have been encountering should be resolved.
Note: If you do not see an option to reset GAP plans, remove the GAP from the deal by zeroing out the price on line 9. Then, go back into the GAP popup and add the GAP back to the deal. Re-save the deal before trying to print or preview the contract.
My Okidata / dot-matrix contract is not lining up correctly. How can I fix it?
Highlight the contract you want to re-align in your contracts list and click "Edit".
To move an individual field, select “individual field” on line 3 and select the field in the contract that you want to move. Then use the arrows to adjust the field as needed.
To move all the fields in the contract at once, select “entire contract” on line 3, and use the arrows to adjust as needed.
You may need to print the contract a few times during this process until you have lined it up properly. Once you are satisfied, you can save the changes for your computer only, or save globally for all computers.
My Trade DMV 262 prints the word "VALUE" rather than the actual dollar amount assigned to the trade value. How can I change this?
By default, the Trade DMV 262 is set up to print "VALUE" in the field for trade Selling Price. The intent behind this is to prevent you from having to re-print the form in the event that you renegotiate the trade value with the customer after printing. However, if you would like the actual dollar amount printed on the form, you can adjust this by editing the contract.
To do this, highlight the Trade DMV 262 form in your contracts list and click the "Edit" button.
In the "Selling Price" field, click the box that reads "Value". Then click the eye icon on the left-hand side of the screen to hide this text.
Next, click into the blinded box that shows the trade value dollar amount (this will likely be behind the box that says "value"). Click the eye icon to un-blind it. Lastly, click "Save Globally" to save your changes. You can then close this window and print the form.
What happens if I need to update buyer information after creating an eSign package?
Why are my DMV fees being split in the itemization on the retail installment contract?
In California, any vehicle that is four model years old or less is exempt from a transfer smog, and an $8 fee is due in lieu of the smog certification.When a deal is created, the system will automatically detect if a vehicle falls within this four year exception and will not add a default smog fee/smog cert fee to the deal. In this situation, you will see a note on line 5 of the Deal screen that says "Rule 2019", signifying that the 2019 law effects the smog rules for the vehicle being sold. The system will also automatically deduct $8 from the DMV fees to be itemized as an exemption fee on the retail installment contract.
In the below example you can see the Rule 2019 notice on line 5 and the DMV fee breakdown on line 8. When viewing the RISC, you'll see that $8 have been deducted from registration fees and itemized on line 4 as a state emissions exemption fee.
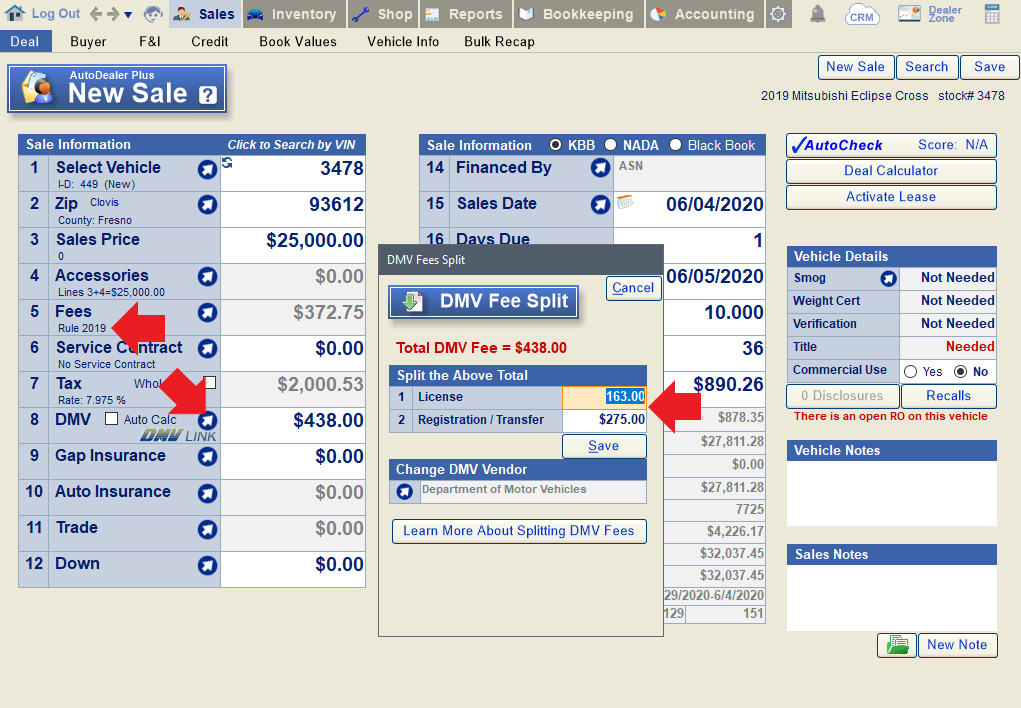
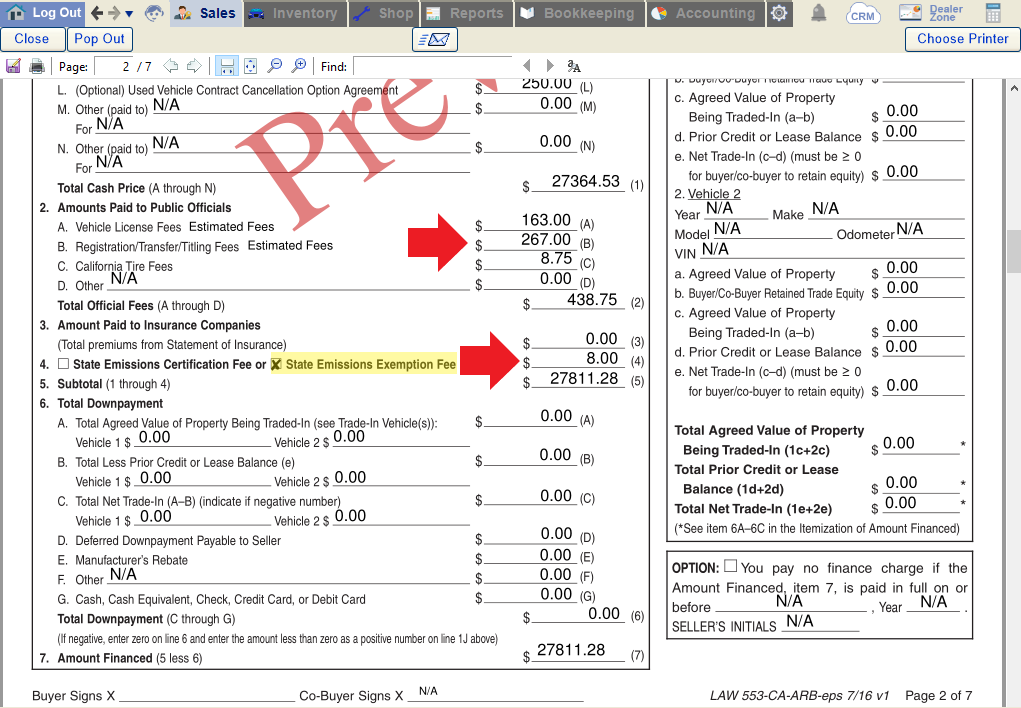
To avoid undercharging for DMV fees, you can use the DMV Link on line 8 of the Deal screen to calculate accurate fees for the vehicle in question using an interface with the CA DMV website. If you choose not to use this feature, be sure to add an additional $8 to the DMV fees inputted on line 5 to account for the smog exception fee when relevant.
Why doesn't the "Total of Payments" on line 27 of the Deal sceen match the "Total of Payments" in the Truth-In-Lending section of the Retail Installment Contract?
If the Total of Payments figure differs between the Deal screen and the Retail Installment Contract, the most likely reason is that the deal includes a deferred down payment. While the figure on line 27 of the Deal screen does not include any deferred down payment(s), the Total of Payments in the Truth in Lending box does, per Regulation Z guidelines.
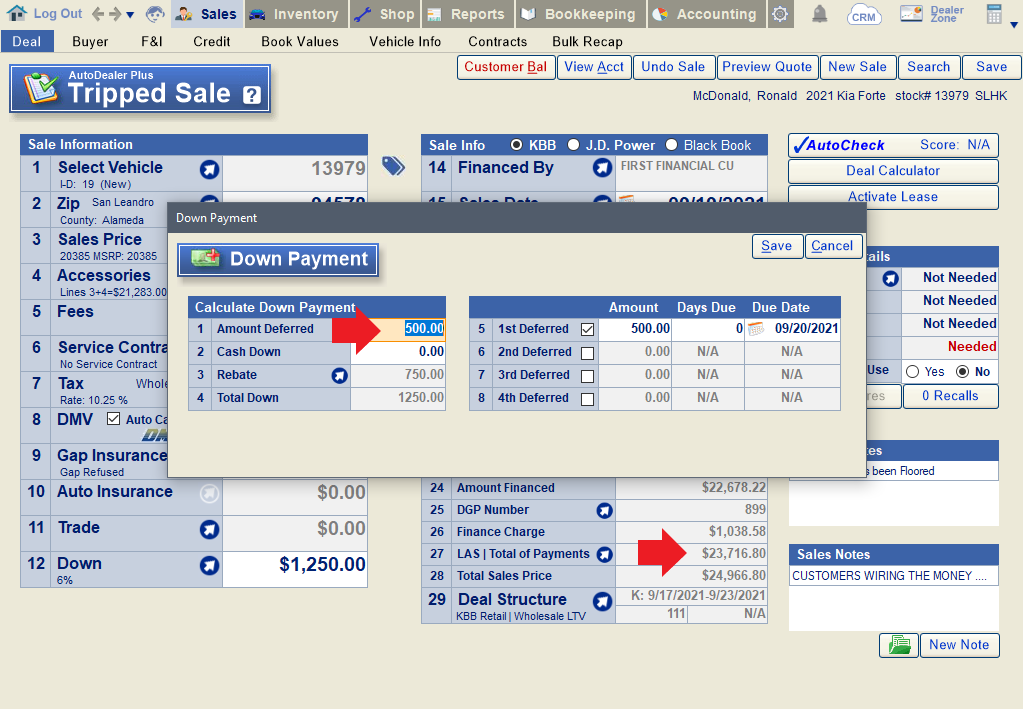
This deal includes a $500 deferred payment, which is not included in the "Total of Payments" calculated on line 27 of the Deal screen.
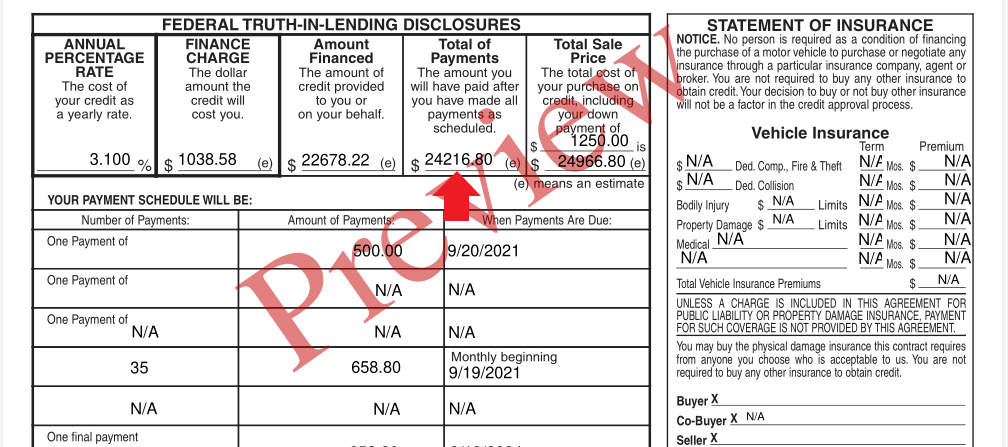
The 553 correctly includes the deferred payment in the calculation of "Total of Payments" for Federal Truth-In Lending Disclosures.
Why doesn't the down payment on my Retail Installment Contract match the information in the deal screen? (deals with negative trade equity)
When a deal has a trade-in with negative equity (the lien value is more than the trade value), this will effect the way the down payment is displayed on the retail installment contact.
In this example, there is a trade-in with a negative value (-$2000), plus a down payment of $3000.
In this case, the Federal Truth in Lending disclosures at the top of the retail installment contract will list the down payment as $1000 ($3000 minus the negative $2000 trade-in value).
The itemization will show the $5000 trade-in value, less $7000 for the lien value, for a net trade-in value of -$2000. Below that, the $3000 down payment is itemized, for a total down payment of $1000 ($3000 down payment - $2000 negative trade value).
Our second example demonstrates how the contract would print in a situation where the down payment does not exceed the negative trade value. In this case, we still have a -$2000 trade-in value, but the down payment is only $1000.
The Federal Truth in Lending Disclosures at the top of the retail installment contract will show a $0 down payment since the total down payment is negative ($1000 down payment - $2000 negative trade-in = -$1000 total down).
The itemization of the down payment will show a $5000 trade-in value minus a $7000 lien value for a net trade-in value of -$2000. Below that, you'll see the $1000 down payment. Since the total down payment is negative ($1000 down - $2000 negative trade-in = -$1000, the total down is listed as $0, and the remaining $1000 owed by the dealer to the lienholder on the trade is itemized above.
Note: The screenshots displayed above are from the CA LAW 553; some things may appear differently depending on your state and the exact retail installment contract you use, but the mechanisms of how the down payment is displayed and itemized on the contract should remain the same. For more information on why the contract appears this way on deals with negative trade equity, see this link from the CFPB (comment 18(j)-3) and this document from the AFSA (page 10).
Why is the Credit Score Disclosure not showing up in my Contracts list to print?
Why isn't the Contract Cancellation Option or Contract Cancellation Refusal showing in my Contracts list?